Posted by R. Jason Sams, Android RenderScript Tech Lead
RenderScript has a very powerful ability called Intrinsics. Intrinsics are built-in functions that perform well-defined operations often seen in image processing. Intrinsics can be very helpful to you because they provide extremely high-performance implementations of standard functions with a minimal amount of code.
RenderScript intrinsics will usually be the fastest possible way for a developer to perform these operations. We’ve worked closely with our partners to ensure that the intrinsics perform as fast as possible on their architectures — often far beyond anything that can be achieved in a general-purpose language.
Table 1. RenderScript intrinsics and the operations they provide.
This example creates a RenderScript context and a Blur intrinsic. It then uses the intrinsic to perform a Gaussian blur with a 25-pixel radius on the allocation. The default implementation of blur uses carefully hand-tuned assembly code, but on some hardware it will instead use hand-tuned GPU code.
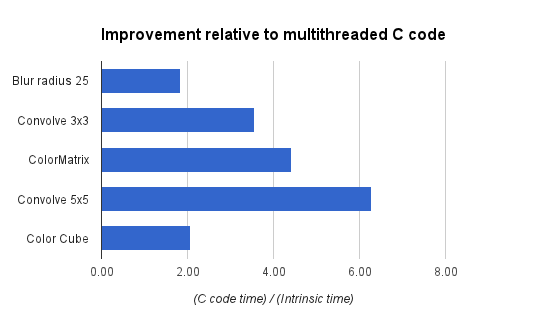
What do developers get from the tuning that we’ve done? On the new Nexus 7, running that same 25-pixel radius Gaussian blur on a 1.6 megapixel image takes about 176ms. A simpler intrinsic like the color matrix operation takes under 4ms. The intrinsics are typically 2-3x faster than a multithreaded C implementation and often 10x+ faster than a Java implementation. Pretty good for eight lines of code.
Figure 1. Performance gains with RenderScript intrinsics, relative to equivalent multithreaded C implementations.
Applications that need additional functionality can mix these intrinsics with their own RenderScript kernels. An example of this would be an application that is taking camera preview data, converting it from YUV to RGB, adding a vignette effect, and uploading the final image to a SurfaceView for display.
In this example, we’ve got a stream of data flowing between a source device (the camera) and an output device (the display) with a number of possible processors along the way. Today, these operations can all run on the CPU, but as architectures become more advanced, using other processors becomes possible.
For example, the vignette operation can happen on a compute-capable GPU (like the ARM Mali T604 in the Nexus 10), while the YUV to RGB conversion could happen directly on the camera’s image signal processor (ISP). Using these different processors could significantly improve power consumption and performance. As more these processors become available, future Android updates will enable RenderScript to run on these processors, and applications written for RenderScript today will begin to make use of those processors transparently, without any additional work for developers.
Intrinsics provide developers a powerful tool they can leverage with minimal effort to achieve great performance across a wide variety of hardware. They can be mixed and matched with general purpose developer code allowing great flexibility in application design. So next time you have performance issues with image manipulation, I hope you give them a look to see if they can help.
Posted by Kristan Uccello, Google Developer Relations
It’s rude to talk during a presentation, it disrespects the speaker and annoys the audience. If your application doesn’t respect the rules of audio focus then it’s disrespecting other applications and annoying the user. If you have never heard of audio focus you should take a look at the Android developer training material.
With multiple apps potentially playing audio it's important to think about how they should interact. To avoid every music app playing at the same time, Android uses audio focus to moderate audio playback—your app should only play audio when it holds audio focus. This post provides some tips on how to handle changes in audio focus properly, to ensure the best possible experience for the user.
Requesting audio focus
Audio focus should not be requested when your application starts (don’t get greedy), instead delay requesting it until your application is about to do something with an audio stream. By requesting audio focus through the AudioManager system service, an application can use one of the AUDIOFOCUS_GAIN* constants (see Table 1) to indicate the desired level of focus.
Listing 1. Requesting audio focus.
1. AudioManager am = (AudioManager) mContext.getSystemService(Context.AUDIO_SERVICE);
2.
3.  int result = am.requestAudioFocus(mOnAudioFocusChangeListener,
4.    // Hint: the music stream.
5.    AudioManager.STREAM_MUSIC,
6.    // Request permanent focus.
7.    AudioManager.AUDIOFOCUS_GAIN);
8.  if (result == AudioManager.AUDIOFOCUS_REQUEST_GRANTED) {
9.    mState.audioFocusGranted = true;
10. } else if (result == AudioManager.AUDIOFOCUS_REQUEST_FAILED) {
11.   mState.audioFocusGranted = false;
12. }
In line 7 above, you can see that we have requested permanent audio focus. An application could instead request transient focus using AUDIOFOCUS_GAIN_TRANSIENT which is appropriate when using the audio system for less than 45 seconds.
Alternatively, the app could use AUDIOFOCUS_GAIN_TRANSIENT_MAY_DUCK, which is appropriate when the use of the audio system may be shared with another application that is currently playing audio (e.g. for playing a "keep it up" prompt in a fitness application and expecting background music to duck during the prompt). The app requesting AUDIOFOCUS_GAIN_TRANSIENT_MAY_DUCK should not use the audio system for more than 15 seconds before releasing focus.
Handling audio focus changes
In order to handle audio focus change events, an application should create an instance of OnAudioFocusChangeListener. In the listener, the application will need to handle theAUDIOFOCUS_GAIN* event and AUDIOFOCUS_LOSS* events (see Table 1). It should be noted that AUDIOFOCUS_GAIN has some nuances which are highlighted in Listing 2, below.
AUDIOFOCUS_GAIN is used in two distinct scopes of an applications code. First, it can be used when registering for audio focus as shown in Listing 1. This does NOT translate to an event for the registered OnAudioFocusChangeListener, meaning that on a successful audio focus request the listener will NOT receive an AUDIOFOCUS_GAIN event for the registration.
AUDIOFOCUS_GAIN is also used in the implementation of an OnAudioFocusChangeListener as an event condition. As stated above, the AUDIOFOCUS_GAIN event will not be triggered on audio focus requests. Instead the AUDIOFOCUS_GAIN event will occur only after an AUDIOFOCUS_LOSS* event has occurred. This is the only constant in the set shown Table 1 that is used in both scopes.
There are four cases that need to be handled by the focus change listener. When the application receives an AUDIOFOCUS_LOSS this usually means it will not be getting its focus back. In this case the app should release assets associated with the audio system and stop playback. As an example, imagine a user is playing music using an app and then launches a game which takes audio focus away from the music app. There is no predictable time for when the user will exit the game. More likely, the user will navigate to the home launcher (leaving the game in the background) and launch yet another application or return to the music app causing a resume which would then request audio focus again.
However another case exists that warrants some discussion. There is a difference between losing audio focus permanently (as described above) and temporarily. When an application receives an AUDIOFOCUS_LOSS_TRANSIENT, the behavior of the app should be that it suspends its use of the audio system until it receives an AUDIOFOCUS_GAIN event. When the AUDIOFOCUS_LOSS_TRANSIENT occurs, the application should make a note that the loss is temporary, that way on audio focus gain it can reason about what the correct behavior should be (see lines 13-27 of Listing 2).
Sometimes an app loses audio focus (receives an AUDIOFOCUS_LOSS) and the interrupting application terminates or otherwise abandons audio focus. In this case the last application that had audio focus may receive an AUDIOFOCUS_GAIN event. On the subsequent AUDIOFOCUS_GAIN event the app should check and see if it is receiving the gain after a temporary loss and can thus resume use of the audio system or if recovering from an permanent loss, setup for playback.
If an application will only be using the audio capabilities for a short time (less than 45 seconds), it should use an AUDIOFOCUS_GAIN_TRANSIENT focus request and abandon focus after it has completed its playback or capture. Audio focus is handled as a stack on the system — as such the last process to request audio focus wins.
When audio focus has been gained this is the appropriate time to create a MediaPlayer or MediaRecorder instance and allocate resources. Likewise when an app receives AUDIOFOCUS_LOSS it is good practice to clean up any resources allocated. Gaining audio focus has three possibilities that also correspond to the three audio focus loss cases in Table 1. It is a good practice to always explicitly handle all the loss cases in the OnAudioFocusChangeListener.
Table 1. Audio focus gain and loss implication.
GAIN
LOSS
AUDIOFOCUS_GAIN
AUDIOFOCUS_LOSS
AUDIOFOCUS_GAIN_TRANSIENT
AUDIOFOCUS_LOSS_TRANSIENT
AUDIOFOCUS_GAIN_TRANSIENT_MAY_DUCK
AUDIOFOCUS_LOSS_TRANSIENT_CAN_DUCK
Note: AUDIOFOCUS_GAIN is used in two places. When requesting audio focus it is passed in as a hint to the AudioManager and it is used as an event case in the OnAudioFocusChangeListener. The gain events highlighted in green are only used when requesting audio focus. The loss events are only used in the OnAudioFocusChangeListener.
Table 2. Audio stream types.
Stream Type
Description
STREAM_ALARM
The audio stream for alarms
STREAM_DTMF
The audio stream for DTMF Tones
STREAM_MUSIC
The audio stream for "media" (music, podcast, videos) playback
STREAM_NOTIFICATION
The audio stream for notifications
STREAM_RING
The audio stream for the phone ring
STREAM_SYSTEM
The audio stream for system sounds
An app will request audio focus (see an example in the sample source code linked below) from the AudioManager (Listing 1, line 1). The three arguments it provides are an audio focus change listener object (optional), a hint as to what audio channel to use (Table 2, most apps should use STREAM_MUSIC) and the type of audio focus from Table 1, column 1. If audio focus is granted by the system (AUDIOFOCUS_REQUEST_GRANTED), only then handle any initialization (see Listing 1, line 9).
Note: The system will not grant audio focus (AUDIOFOCUS_REQUEST_FAILED) if there is a phone call currently in process and the application will not receive AUDIOFOCUS_GAIN after the call ends.
Within an implementation of OnAudioFocusChange(), understanding what to do when an application receives an onAudioFocusChange() event is summarized in Table 3.
In the cases of losing audio focus be sure to check that the loss is in fact final. If the app receives an AUDIOFOCUS_LOSS_TRANSIENT or AUDIOFOCUS_LOSS_TRANSIENT_CAN_DUCK it can hold onto the media resources it has created (don’t call release()) as there will likely be another audio focus change event very soon thereafter. The app should take note that it has received a transient loss using some sort of state flag or simple state machine.
If an application were to request permanent audio focus with AUDIOFOCUS_GAIN and then receive an AUDIOFOCUS_LOSS_TRANSIENT_CAN_DUCK an appropriate action for the application would be to lower its stream volume (make sure to store the original volume state somewhere) and then raise the volume upon receiving an AUDIOFOCUS_GAIN event (see Figure 1, below).
Table 3. Appropriate actions by focus change type.
Gain event after loss event: Resume playback of media unless other state flags set by the application indicate otherwise. For example, the user paused the media prior to loss event.
Pause playback and keep a state flag that the loss is transient so that when the AUDIOFOCUS_GAIN event occurs you can resume playback if appropriate. Do not release assets.
Lower volume or pause playback keeping track of state as with AUDIOFOCUS_LOSS_TRANSIENT. Do not release assets.
Conclusion and further reading
Understanding how to be a good audio citizen application on an Android device means respecting the system's audio focus rules and handling each case appropriately. Try to make your application behave in a consistent manner and not negatively surprise the user. There is a lot more that can be talked about within the audio system on Android and in the material below you will find some additional discussions.
We've just finished rolling out the latest release of Google Play services to devices around the world. It offers better performance and greater power savings, as well as enhancements to the Location Based Services, maps, InstantBuy, Google+, and Photo Sphere.
To simplify your testing, we've also released an updated Google APIs emulator image that includes Google Play Services 3.2. You can download the image through the Android SDK Manager.
Maps and Location Based Services
Google Play Services 3.2 includes several enhancements to the Location Based Services. The Fused Location Provider now supports the selection of a low-power mode option when requesting location updates, and the ability to inject mock locations — allowing you to more efficiently test your apps in a variety of simulated conditions.
The geofencing APIs have been updated to support hardware-based GPS geofencing on devices that have supporting hardware, such as the Nexus 4. Hardware geofences consume significantly less battery, and best of all your app will automatically take advantage of this feature on supported hardware without you having to make any changes.
A new Snapshot feature in the maps API lets you capture a bitmap image of the current map in order to improve performance when an interactive map isn't necessary. We’ve also added a listener to the My Location button.
Google+, Photo Sphere, InstantBuy, and Analytics
If you’ve used Google+ sign-in you can take advantage of the new simplified sharing control that can be embedded directly within your app, simplifying the process of sharing content directly to Google+. We’ve also taken the opportunity to add some butter to the Google+ sign-in animation.
The Photo Sphere viewer has also been extended to include a compass mode that allows users to explore Photo Spheres by moving their phones.
The InstantBuy implementation has been improved to increase efficiency, with improved latency, a cleaner UI with contextual text and assets for the holo light theme, and support for passing through loyalty and offers information.
More About Google Play Services
To learn more about Google Play services and the APIs available to you through it, visit the Google Services area of the Android Developers site.
The Android security team has been investigating the root cause of the compromise of a bitcoin transaction that led to the update of multiple Bitcoin applications on August 11.
We have now determined that applications which use the Java Cryptography Architecture (JCA) for key generation, signing, or random number generation may not receive cryptographically strong values on Android devices due to improper initialization of the underlying PRNG. Applications that directly invoke the system-provided OpenSSL PRNG without explicit initialization on Android are also affected. Applications that establish TLS/SSL connections using the HttpClient and java.net classes are not affected as those classes do seed the OpenSSL PRNG with values from /dev/urandom.
Developers who use JCA for key generation, signing or random number generation should update their applications to explicitly initialize the PRNG with entropy from /dev/urandom or /dev/random. A suggested implementation is provided at the end of this blog post. Also, developers should evaluate whether to regenerate cryptographic keys or other random values previously generated using JCA APIs such as SecureRandom, KeyGenerator, KeyPairGenerator, KeyAgreement, and Signature.
In addition to this developer recommendation, Android has developed patches that ensure that Android’s OpenSSL PRNG is initialized correctly. Those patches have been provided to OHA partners.
We would like to thank Soo Hyeon Kim, Daewan Han of ETRI and Dong Hoon Lee of Korea University who notified Google about the improper initialization of OpenSSL PRNG.
Update: the original code sample below crashed on a small fraction of Android devices due to /dev/urandom not being writable. We have now updated the code sample to handle this case gracefully.
/* * This software is provided 'as-is', without any express or implied * warranty. In no event will Google be held liable for any damages * arising from the use of this software. * * Permission is granted to anyone to use this software for any purpose, * including commercial applications, and to alter it and redistribute it * freely, as long as the origin is not misrepresented. */
/** * Fixes for the output of the default PRNG having low entropy. * * The fixes need to be applied via {@link #apply()} before any use of Java * Cryptography Architecture primitives. A good place to invoke them is in the * application's {@code onCreate}. */ public final class PRNGFixes {
private static final int VERSION_CODE_JELLY_BEAN = 16; private static final int VERSION_CODE_JELLY_BEAN_MR2 = 18; private static final byte[] BUILD_FINGERPRINT_AND_DEVICE_SERIAL = getBuildFingerprintAndDeviceSerial();
/** Hidden constructor to prevent instantiation. */ private PRNGFixes() {}
/** * Applies all fixes. * * @throws SecurityException if a fix is needed but could not be applied. */ public static void apply() { applyOpenSSLFix(); installLinuxPRNGSecureRandom(); }
/** * Applies the fix for OpenSSL PRNG having low entropy. Does nothing if the * fix is not needed. * * @throws SecurityException if the fix is needed but could not be applied. */ private static void applyOpenSSLFix() throws SecurityException { if ((Build.VERSION.SDK_INT < VERSION_CODE_JELLY_BEAN) || (Build.VERSION.SDK_INT > VERSION_CODE_JELLY_BEAN_MR2)) { // No need to apply the fix return; }
try { // Mix in the device- and invocation-specific seed. Class.forName("org.apache.harmony.xnet.provider.jsse.NativeCrypto") .getMethod("RAND_seed", byte[].class) .invoke(null, generateSeed());
// Mix output of Linux PRNG into OpenSSL's PRNG int bytesRead = (Integer) Class.forName( "org.apache.harmony.xnet.provider.jsse.NativeCrypto") .getMethod("RAND_load_file", String.class, long.class) .invoke(null, "/dev/urandom", 1024); if (bytesRead != 1024) { throw new IOException( "Unexpected number of bytes read from Linux PRNG: " + bytesRead); } } catch (Exception e) { throw new SecurityException("Failed to seed OpenSSL PRNG", e); } }
/** * Installs a Linux PRNG-backed {@code SecureRandom} implementation as the * default. Does nothing if the implementation is already the default or if * there is not need to install the implementation. * * @throws SecurityException if the fix is needed but could not be applied. */ private static void installLinuxPRNGSecureRandom() throws SecurityException { if (Build.VERSION.SDK_INT > VERSION_CODE_JELLY_BEAN_MR2) { // No need to apply the fix return; }
// Install a Linux PRNG-based SecureRandom implementation as the // default, if not yet installed. Provider[] secureRandomProviders = Security.getProviders("SecureRandom.SHA1PRNG"); if ((secureRandomProviders == null) || (secureRandomProviders.length < 1) || (!LinuxPRNGSecureRandomProvider.class.equals( secureRandomProviders[0].getClass()))) { Security.insertProviderAt(new LinuxPRNGSecureRandomProvider(), 1); }
// Assert that new SecureRandom() and // SecureRandom.getInstance("SHA1PRNG") return a SecureRandom backed // by the Linux PRNG-based SecureRandom implementation. SecureRandom rng1 = new SecureRandom(); if (!LinuxPRNGSecureRandomProvider.class.equals( rng1.getProvider().getClass())) { throw new SecurityException( "new SecureRandom() backed by wrong Provider: " + rng1.getProvider().getClass()); }
SecureRandom rng2; try { rng2 = SecureRandom.getInstance("SHA1PRNG"); } catch (NoSuchAlgorithmException e) { throw new SecurityException("SHA1PRNG not available", e); } if (!LinuxPRNGSecureRandomProvider.class.equals( rng2.getProvider().getClass())) { throw new SecurityException( "SecureRandom.getInstance(\"SHA1PRNG\") backed by wrong" + " Provider: " + rng2.getProvider().getClass()); } }
/** * {@code Provider} of {@code SecureRandom} engines which pass through * all requests to the Linux PRNG. */ private static class LinuxPRNGSecureRandomProvider extends Provider {
public LinuxPRNGSecureRandomProvider() { super("LinuxPRNG", 1.0, "A Linux-specific random number provider that uses" + " /dev/urandom"); // Although /dev/urandom is not a SHA-1 PRNG, some apps // explicitly request a SHA1PRNG SecureRandom and we thus need to // prevent them from getting the default implementation whose output // may have low entropy. put("SecureRandom.SHA1PRNG", LinuxPRNGSecureRandom.class.getName()); put("SecureRandom.SHA1PRNG ImplementedIn", "Software"); } }
/** * {@link SecureRandomSpi} which passes all requests to the Linux PRNG * ({@code /dev/urandom}). */ public static class LinuxPRNGSecureRandom extends SecureRandomSpi {
/* * IMPLEMENTATION NOTE: Requests to generate bytes and to mix in a seed * are passed through to the Linux PRNG (/dev/urandom). Instances of * this class seed themselves by mixing in the current time, PID, UID, * build fingerprint, and hardware serial number (where available) into * Linux PRNG. * * Concurrency: Read requests to the underlying Linux PRNG are * serialized (on sLock) to ensure that multiple threads do not get * duplicated PRNG output. */
private static final File URANDOM_FILE = new File("/dev/urandom");
private static final Object sLock = new Object();
/** * Input stream for reading from Linux PRNG or {@code null} if not yet * opened. * * @GuardedBy("sLock") */ private static DataInputStream sUrandomIn;
/** * Output stream for writing to Linux PRNG or {@code null} if not yet * opened. * * @GuardedBy("sLock") */ private static OutputStream sUrandomOut;
/** * Whether this engine instance has been seeded. This is needed because * each instance needs to seed itself if the client does not explicitly * seed it. */ private boolean mSeeded;
@Override protected void engineSetSeed(byte[] bytes) { try { OutputStream out; synchronized (sLock) { out = getUrandomOutputStream(); } out.write(bytes); out.flush(); } catch (IOException e) { // On a small fraction of devices /dev/urandom is not writable. // Log and ignore. Log.w(PRNGFixes.class.getSimpleName(), "Failed to mix seed into " + URANDOM_FILE); } finally { mSeeded = true; } }
@Override protected void engineNextBytes(byte[] bytes) { if (!mSeeded) { // Mix in the device- and invocation-specific seed. engineSetSeed(generateSeed()); }
try { DataInputStream in; synchronized (sLock) { in = getUrandomInputStream(); } synchronized (in) { in.readFully(bytes); } } catch (IOException e) { throw new SecurityException( "Failed to read from " + URANDOM_FILE, e); } }
private DataInputStream getUrandomInputStream() { synchronized (sLock) { if (sUrandomIn == null) { // NOTE: Consider inserting a BufferedInputStream between // DataInputStream and FileInputStream if you need higher // PRNG output performance and can live with future PRNG // output being pulled into this process prematurely. try { sUrandomIn = new DataInputStream( new FileInputStream(URANDOM_FILE)); } catch (IOException e) { throw new SecurityException("Failed to open " + URANDOM_FILE + " for reading", e); } } return sUrandomIn; } }
/** * Generates a device- and invocation-specific seed to be mixed into the * Linux PRNG. */ private static byte[] generateSeed() { try { ByteArrayOutputStream seedBuffer = new ByteArrayOutputStream(); DataOutputStream seedBufferOut = new DataOutputStream(seedBuffer); seedBufferOut.writeLong(System.currentTimeMillis()); seedBufferOut.writeLong(System.nanoTime()); seedBufferOut.writeInt(Process.myPid()); seedBufferOut.writeInt(Process.myUid()); seedBufferOut.write(BUILD_FINGERPRINT_AND_DEVICE_SERIAL); seedBufferOut.close(); return seedBuffer.toByteArray(); } catch (IOException e) { throw new SecurityException("Failed to generate seed", e); } }
/** * Gets the hardware serial number of this device. * * @return serial number or {@code null} if not available. */ private static String getDeviceSerialNumber() { // We're using the Reflection API because Build.SERIAL is only available // since API Level 9 (Gingerbread, Android 2.3). try { return (String) Build.class.getField("SERIAL").get(null); } catch (Exception ignored) { return null; } }
private static byte[] getBuildFingerprintAndDeviceSerial() { StringBuilder result = new StringBuilder(); String fingerprint = Build.FINGERPRINT; if (fingerprint != null) { result.append(fingerprint); } String serial = getDeviceSerialNumber(); if (serial != null) { result.append(serial); } try { return result.toString().getBytes("UTF-8"); } catch (UnsupportedEncodingException e) { throw new RuntimeException("UTF-8 encoding not supported"); } } }
Posted by Chris Banes, Android Developer Relations
Following on the Android 4.3 and Nexus 7 announcements, we recently released two important tools to help you build beautiful apps that follow Android Design best practices:
We released a new backward-compatible Action Bar implementation called ActionBarCompat that's part of the Support Library r18. The ActionBarCompat APIs let you build the essential Action Bar design pattern into your app, with broad compatibility back to Android 2.1.
We released the full source code for the I/O 2013 app, which gives you working examples of ActionBarCompat, responsive design for phones and tablets, Google+ sign-in, synchronized data kept fresh through Google Cloud Messaging, livestreaming using the YouTube Android Player API, Google Maps API v2, and much more. All of the app code and resources are available for you to browse or download, and it's all licensed under Apache License 2.0/Creative Commons 3.0 BY so you can reuse it in your apps. You can get the source at code.google.com/p/iosched
This post helps you get started with ActionBarCompat, from setting up the Support Library to adding an Action Bar to your UI. If you want to see ActionBarCompat in action first, download the I/O 2013 app from Google Play and give it a try. The app's Action Bar is built using the ActionBarCompat and served as our main test environment for making sure the APIs work properly, with full compatibility across platform versions.
Getting Started with ActionBarCompat
ActionBarCompat is a new API in the Android Support Library that allows you to add an Action Bar to applications targeting minSdkVersion 7 or greater. The API and integration have been designed to closely mirror the existing framework APIs, giving you an easy migration path for your existing apps.
If you've already using another implementation of Action Bar in your app, you can choose whether to ActionBarCompat. If you’re using the old ActionBarCompat sample available through the SDK, then we highly recommend that you upgrade to the new ActionBarCompat API in the Support Library. If you’re using a third-party solution (such as ActionBarSherlock), there are a few reasons to consider upgrading:
Can be kept updated as the Action Bar API evolves.
ActionBarSherlock is a solid and well-tested library which has served developers very well for a long time. If you are already using it and do not currently require any of the above then there is no need to migrate.
If you are ready to get started with ActionBarCompat, the sections below take you through the process.
1. Add ActionBarCompat as a project dependency
ActionBarCompat is distributed as both a Gradle artifact and a library project. See Setting Up the Support Library for more information.
2. Update your style resources
The first thing to update are your Activity themes so they use a Theme.AppCompat theme. If you're currently using one of the Theme.Holo themes then just replace this with the related Theme.AppCompat theme. For instance if you have the following in your AndroidManifest.xml:
Things get more tricky when you have a customized theme. The first thing to do is change your base theme to one of the Theme.AppCompat themes, like above.
If you have customized styles for the Action Bar (and related widgets) then you must also change these styles to extend from the Widget.AppCompat version. You also need to double-set each attribute: once in the Android namespace and again with no namespace (the default namespace).
For example, in the following example we have a custom theme which extends from Theme.Holo.Light, which references a custom Action Bar style.
To make this work with AppCompat you would move the above styles into the values-v14 folder, modifying each style's parent to be an AppCompat version.
<style name="Theme.Styled" parent="@style/Theme.AppCompat.Light">
    <!-- Setting values in the android namespace affects API levels 14+ -->
    <item name="android:actionBarStyle">@style/Widget.Styled.ActionBar</item>
</style>

<style name="Widget.Styled.ActionBar" parent="@style/Widget.AppCompat.Light.ActionBar">
    <!-- Setting values in the android namespace affects API levels 14+ -->
    <item name="android:background">@drawable/ab_custom_solid_styled</item>
    <item name="android:backgroundStacked"
      >@drawable/ab_custom_stacked_solid_styled</item>
    <item name="android:backgroundSplit"
      >@drawable/ab_custom_bottom_solid_styled</item>
</style>
You would then need add the following into the values folder:
<style name="Theme.Styled" parent="@style/Theme.AppCompat.Light">
    <!-- Setting values in the default namespace affects API levels 7-13 -->
    <item name="actionBarStyle">@style/Widget.Styled.ActionBar</item>
</style>

<style name="Widget.Styled.ActionBar" parent="@style/Widget.AppCompat.Light.ActionBar">
    <!-- Setting values in the default namespace affects API levels 7-13 -->
    <item name="background">@drawable/ab_custom_solid_styled</item>
    <item name="backgroundStacked">@drawable/ab_custom_stacked_solid_styled</item>
    <item name="backgroundSplit">@drawable/ab_custom_bottom_solid_styled</item>
</style>
3. Modify Menu resources
As with the standard Action Bar in Android 3.0 and later versions, action items are added via the options menu. The difference with ActionBarCompat is that you need to modify your Menu resource files so that any action item attributes come from ActionBarCompat's XML namespace.
In the example below you can see that a new "yourapp" namespace has been added to the menu element, with the showAsAction and actionProviderClass attributes being provided from this namespace. You should also do this for the other action item attributes (actionLayout and actionViewClass) if you use them.
ActionBarCompat contains one Activity class which all of your Activity classes should extend: ActionBarActivity.
This class itself extends from FragmentActivity so you can continue to use Fragments in your application. There is not a ActionBarCompat Fragment class that you need to extend, so you should continue using android.support.v4.Fragment as the base class for your Fragments.
5. Add Menu callbacks
To display items on the Action Bar, you need to populate it by overriding onCreateOptionsMenu() and populating the Menu object. The best way to do this is by inflating a menu resource. If you need to call any MenuItem methods introduced in API level 11 or later, you need to call the shim for that method in MenuItemCompat instead. Here's an example:
@Override
public boolean onCreateOptionsMenu(Menu menu) {
    // Inflate the menu
    getMenuInflater().inflate(R.menu.main_menu, menu);

    // Find the share item
    MenuItem shareItem = menu.findItem(R.id.menu_share);

    // Need to use MenuItemCompat to retrieve the Action Provider
    mActionProvider = (ShareActionProvider)
        MenuItemCompat.getActionProvider(shareItem);

    return super.onCreateOptionsMenu(menu);
}
6. Retrieve the Action Bar
ActionBarCompat contains it’s own ActionBar class, and to retrieve the Action Bar attached to your activity you call getSupportActionBar(). The API exposed by the compatibility class mirrors that of the framework ActionBar class, allowing you to alter the navigation, show/hide it, and change how it display it’s contents.
7. Add ActionMode callbacks
To start an action mode from your ActionBarActivity simply call startSupportActionMode(), providing a callback similar to how you would with the native action mode. The following example shows how to start an action mode, inflate a menu resource and react to user’s selection:
startSupportActionMode(new ActionMode.Callback() {
    @Override
    public boolean onCreateActionMode(ActionMode actionMode, Menu menu) {
        // Inflate our menu from a resource file
        actionMode.getMenuInflater().inflate(R.menu.action_mode_main, menu);

        // Return true so that the action mode is shown
        return true;
    }

    @Override
    public boolean onPrepareActionMode(ActionMode actionMode, Menu menu) {
        // As we do not need to modify the menu before displayed, we return false.
        return false;
    }

    @Override
    public boolean onActionItemClicked(ActionMode actionMode, MenuItem menuItem) {
        // Similar to menu handling in Activity.onOptionsItemSelected()
        switch (menuItem.getItemId()) {
            case R.id.menu_remove:
                // Some remove functionality
                return true;
        }

        return false;
    }

    @Override
    public void onDestroyActionMode(ActionMode actionMode) {
        // Allows you to be notified when the action mode is dismissed
    }
});
Similar to the Activity class, ActionBarActivity provides two methods that you can override to be notified when an action mode is started/finished from within your Activity (including attached Fragments). The methods are onSupportActionModeStarted() and onSupportActionModeFinished().
8. Add support for Up navigation
Simple example
Up navigation support is built into ActionBarCompat and is similar to that provided in the Android framework in Android 4.1 and higher.
In the simplest form, you just need add a reference in each AndroidManifest<activity> element to its logical parent activity. This is done by adding a metadata element to the <activity> element. You should also set the android:parentActivityName attribute for explicit Android 4.1 support, although this is not strictly necessary for ActionBarCompat:
When the user now clicks on the home item, the user will navigate up to the parent Activity set in your AndroidManifest.
Advanced calls
There are a number of methods which can be overridden to customize what happens when a user clicks on the home item. Each of the methods below replicate/proxy similarly-named methods added in Android 4.1:
onSupportNavigateUp()
supportNavigateUpTo(Intent)
getSupportParentActivityIntent()
supportShouldUpRecreateTask(Intent)
onCreateSupportNavigateUpTaskStack(TaskStackBuilder) and onPrepareSupportNavigateUpTaskStack(TaskStackBuilder)
Requesting Window features
When using ActionBarActivity you should call supportRequestWindowFeature() to request window features. For instance the following piece of code requests an overlay action bar:
// Needs to be called before setting the content view supportRequestWindowFeature(Window.FEATURE_ACTION_BAR_OVERLAY);
// Now set the content view setContentView(R.layout.activity_main); ... }
Adding support for ProgressBar
Similar to the native Action Bar, ActionBarCompat supports displaying progress bars on the Action Bar. First you need to request the window feature, you then display or alter the progress bars with one of the following methods, each of which mirror functionality in the similar named method from Activity:
setSupportProgress()
setSupportProgressBarIndeterminate()
setSupportProgressBarVisibility()
setSupportProgressBarIndeterminateVisibility()
Below is an example which requests an indeterminate progress bar, and then later displays it:
// Needs to be called before setting the content view supportRequestWindowFeature(Window.FEATURE_INDETERMINATE_PROGRESS);
// Now set the content view setContentView(R.layout.activity_main); ... // When ready, show the indeterminate progress bar setSupportProgressBarIndeterminateVisibility(true); }
Further Reading
The Action Bar API Guide covers a lot of what is in this post and much more. Even if you have used the Action Bar API in the past, it’s definitely worth reading to see how ActionBarCompat differs from the framework.
There are also a number of sample applications using ActionBarCompat covering how to use the library in various ways. You can find them in the “Samples for SDK” package in the SDK Manager.
Check out the video below for a quick hands-on with ActionBarCompat.
 style="border:1px solid #ddd;border-radius: 6px;" />