Friday, 23 May 2014

Another Easy Sample For Notification Pages on Android Wear


Today’s post on #AndroidWear is from +Wayne Piekarski.


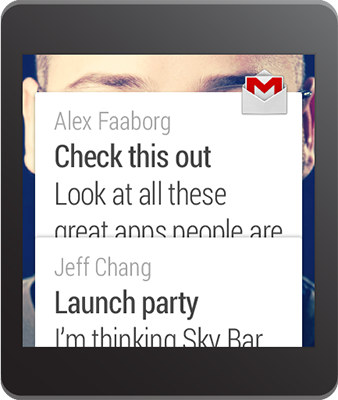
Adding extra pages to notifications with the Android Wear Developer Preview is really simple, and it all comes down to one extra line of code shown highlighted here:
Notification notification1 = new WearableNotifications.Builder(builder1)
.addPages(extras)
.build();


The video embedded above demonstrated some code that helps notify a user when library books are overdue. The code is included below using similar notification APIs you are already familiar with, but this time we build up a list of extra pages and then add them. The wearable-specific code is highlighted below:

// Nuke all previous notifications and generate unique ids
NotificationManagerCompat.from(this).cancelAll();
int notificationId = 0;

// Titles, authors, and overdue status of some books to display
String[] titles = { "How to survive with no food",
"Sailing around the world",
"Navigation on the high seas",
"Avoiding sea monsters",
"Salt water distillation",
"Sail boat maintenance" };
String[] authors = { "I. M. Hungry",
"F. Magellan",
"E. Shackleton",
"K. Kracken",
"U. R. Thirsty",
"J. Macgyver" };
Boolean[] overdue = { true, true, true, true, true, false };
List extras = new ArrayList();

// Extra pages of information for the notification that will
// only appear on the wearable
int numOverdue = 0;
for (int i = 0; i < titles.length; i++) {
if (!overdue[i]) continue;
BigTextStyle extraPageStyle = new NotificationCompat.BigTextStyle();
extraPageStyle.setBigContentTitle("Overdue Book " + (i+1))
.bigText("Title: " + titles[i] + ", Author: " + authors[i]);
Notification extraPageNotification = new NotificationCompat.Builder(this)
.setStyle(extraPageStyle)
.build();
extras.add(extraPageNotification);

numOverdue++;
}

// Main notification that will appear on the phone handset and the wearable
Intent viewIntent1 = new Intent(this, MainActivity.class);
PendingIntent viewPendingIntent1 =
PendingIntent.getActivity(this, notificationId+1, viewIntent1, 0);
NotificationCompat.Builder builder1 = new NotificationCompat.Builder(this)
.addAction(R.drawable.ic_action_done, "Returned", viewPendingIntent1)
.setContentTitle("Books Overdue")
.setContentText("You have " + numOverdue + " books due at the library")
.setSmallIcon(R.drawable.ic_launcher);
Notification notification1 = new WearableNotifications.Builder(builder1)
.addPages(extras)
.build();


// Issue the notification
NotificationManagerCompat notificationManager = NotificationManagerCompat.from(this);
notificationManager.notify(notificationId+1, notification1);

Follow these simple steps to see the example in action:
    1. First, make sure you’ve followed the Android Wear Developer Preview instructions to get your IDE set up correctly.

    2. Once the IDE is ready, create a new Android project with all the defaults. Make sure it compiles and runs before you continue to make fixing any problems easier.

    3. Add the necessary support libraries by following the installation instructions so that your project supports wearable notifications.

    4. Create a method in your main activity called showPageNotifications(), and paste all the code into it.

    5. Call showPageNotifications() from your activity’s onCreate() to show the notifications automatically at startup. Alternatively, add a button that calls the method on click.

    6. Add the below imports, or just have your IDE auto-add the missing imports.
    import android.support.v4.app.NotificationCompat;
    import android.app.Notification;
    import android.app.PendingIntent;
    import android.content.Intent;
    import android.graphics.Bitmap;
    import android.graphics.BitmapFactory;
    import android.preview.support.v4.app.NotificationManagerCompat;
    import android.preview.support.wearable.notifications.WearableNotifications;

    7. Add the image below to your res/drawable-xxhdpi directory.


    8. Build the project. If there are any compile issues try a clean build of the project.

    9. You can now run the application on your phone, and see the results on the wearable emulator.

Once again, you can see that building with Android Wear is really easy! After experimenting with this code, check out the detailed documentation for the full story.
Friday, 16 May 2014

Stacking Notifications For Android Wear Is This Easy

Today’s post on #AndroidWear is from +Wayne Piekarski.


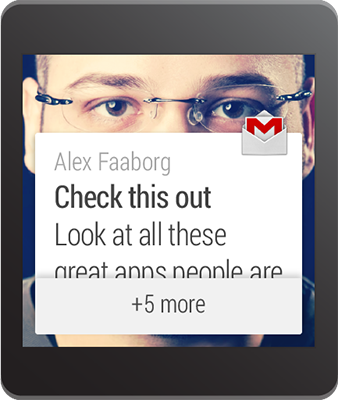
Stacking notifications with the Android Wear Developer Preview is really simple—it requires only a few lines of extra notification code:


Notification wearableNotification =
new WearableNotifications.Builder(
notificationCompatBuilder)
.setGroup(“messages”)
.build();


A few weeks ago, I published a new DevBytes video which covered how to implement stacking notifications with Android Wear:


In the video, I included a demonstration of what these notifications look like in the emulator, and thought it would be useful to share the code for the demo. If you’re just getting started with stacked notifications, this should be all you need to get up and running right away. So here it is, with some additional instructions below. The wearable-specific code is highlighted and in bold.


Bitmap bitmapMila = BitmapFactory.decodeResource(getResources(), R.drawable.mila128);

// Nuke all previous notifications and generate unique ids
NotificationManagerCompat.from(this).cancelAll();
int notificationId = 0;

// String to represent the group all the notifications will be a part of
final String GROUP_KEY_MESSAGES = "group_key_messages";

// Group notification that will be visible on the phone
NotificationCompat.Builder builderG = new NotificationCompat.Builder(this)
.setContentTitle("2 Pet Notifications")
.setContentText("Mila and Dylan both sent messages")
.setSmallIcon(R.drawable.ic_launcher)
.setLargeIcon(bitmapMila);
Notification summaryNotification = new WearableNotifications.Builder(builderG)
.setGroup(GROUP_KEY_MESSAGES, WearableNotifications.GROUP_ORDER_SUMMARY)
.build();


// Separate notifications that will be visible on the watch
Intent viewIntent1 = new Intent(this, MainActivity.class);
PendingIntent viewPendingIntent1 =
PendingIntent.getActivity(this, notificationId+1, viewIntent1, 0);
NotificationCompat.Builder builder1 = new NotificationCompat.Builder(this)
.addAction(R.drawable.ic_action_done, "Treat Fed", viewPendingIntent1)
.setContentTitle("Message from Mila")
.setContentText("What's for dinner? "
+ "Can we have steak?")
.setSmallIcon(R.drawable.ic_launcher);
Notification notification1 = new WearableNotifications.Builder(builder1)
.setGroup(GROUP_KEY_MESSAGES)
.build();


Intent viewIntent2 = new Intent(this, MainActivity.class);
PendingIntent viewPendingIntent2 =
PendingIntent.getActivity(this, notificationId+2, viewIntent2, 0);
NotificationCompat.Builder builder2 = new NotificationCompat.Builder(this)
.addAction(R.drawable.ic_action_done, "Water Filled", viewPendingIntent2)
.setContentTitle("Message from Dylan")
.setContentText("Can you refill our water bowl?")
.setSmallIcon(R.drawable.ic_launcher);
Notification notification2 = new WearableNotifications.Builder(builder2)
.setGroup(GROUP_KEY_MESSAGES)
.build();


// Issue the group notification
NotificationManagerCompat notificationManager = NotificationManagerCompat.from(this);
notificationManager.notify(notificationId+0, summaryNotification);

// Issue the separate wear notifications
notificationManager.notify(notificationId+2, notification2);
notificationManager.notify(notificationId+1, notification1);


Using the code is really simple:


  1. First, make sure you’ve followed the Android Wear Developer Preview instructions to get your IDE set up correctly.

  2. Once the IDE is ready, create a new Android project with all the defaults. Make sure it compiles and runs before you continue to make fixing any problems easier.

  3. Add the necessary support libraries by following the installation instructions so that your project supports wearable notifications.

  4. Create a method in your main activity called showTheNotifications(), and paste all the code into it.

  5. Call showTheNotifications() from your activity’s onCreate method to show the notifications automatically at startup. Alternatively, add a button that calls the method on click.

  6. Add the below imports, or just have your IDE auto-add the missing imports.

    import android.support.v4.app.NotificationCompat;
    import android.app.Notification;
    import android.app.PendingIntent;
    import android.content.Intent;
    import android.graphics.Bitmap;
    import android.graphics.BitmapFactory;
    import android.preview.support.v4.app.NotificationManagerCompat;
    import android.preview.support.wearable.notifications.WearableNotifications;

  7. Add the images on the right to your drawable directories.


    res/drawable-xxhdpi/ic_action_done.png


    res/drawable-nodpi/mila128.jpg


  8. Build the project. If there are any compile issues try a clean build of the project.

  9. You can now run the application on your phone, and see the results on the wearable.


And that’s basically it, it’s really simple! Once you have a good feel for how the code works, make sure to check out the stacking notifications documentation to learn more. Make sure to also familiarize yourself with the Android Wear Design Principles, which explain more about the types of icons that should be used for actions. For the picture of the dog, it’s important you use an image that is quite small, and not straight from a digital camera, since there are limits to the size of the images that can be handled by the API.


I hope this post is useful in helping you to get started with Android Wear notifications!

Thursday, 15 May 2014

Helping You Go Global with More Seamless Google Play Payments


By Ibrahim Elbouchikhi, Google Play Product Manager


Sales of apps and games on Google Play are up by more than 300 percent over the past year. And today, two-thirds of Google Play purchases happen outside of the United States, with international sales continuing to climb. We’re hoping to fuel this momentum by making Google Play payments easier and more convenient for people around the world.


PayPal support


Starting today, we're making it possible for people to choose PayPal for their Google Play purchases in 12 countries, including the U.S., Germany, and Canada. When you make a purchase on Google Play in these countries, you'll find PayPal as an option in your Google Wallet; just enter your PayPal account login and you'll easily be able to make purchases. Our goal is to provide users with a frictionless payment experience, and this new integration is another example of how we work with partners from across the payments industry to deliver this to the user.


Carrier billing and Google Play gift cards in more countries


Carrier billing—which lets people charge purchases in Google Play directly to their phone bill—continues to be a popular way to pay. We’ve just expanded coverage to seven more countries for a total of 24, including Singapore, Thailand and Taiwan. That means almost half of all Google Play users have this option when making their purchases.


We’ve also made Google Play gift cards available to a total of 13 countries, including Japan and Germany.


Support for developer sales in more countries


Developers based in 13 new countries can now sell apps on Google Play (with new additions such as Indonesia, Malaysia and Turkey), bringing the total to 45 countries with support for local developers. We’ve also increased our buyer currency support to 28 new countries, making it even easier for you to tailor your pricing in 60 countries.


Nothing for you to do!


Of course, as developers, when it comes to payments, there’s nothing for you to do; we process all payments, reconcile all currencies globally, and make a monthly deposit in your designated bank account. This means you get to focus on what you do best: creating beautiful and engaging apps and games.


Visit developer.android.com for more information.


Per-country availability of forms of payment is summarized here.


Wednesday, 7 May 2014

Google Play services 4.4

gps

A new release of Google Play services has now been rolled out to the world, and as usual we have a number of features that can make your apps better than before. This release includes a major enhancement to Maps with the introduction of Street View, as well as new features in Location, Games Services, Mobile Ads, and Wallet API.


Here are the highlights of Google Play services release 4.4:


Google Maps Android API

Starting with a much anticipated announcement for the Google Maps Android API: Introducing Street View. You can now embed Street View imagery into an activity enabling your users to explore the world through panoramic 360-degree views. Programmatically control the zoom and orientation (tilt and bearing) of the Street View camera, and animate the camera movements over a given duration. Here is an example of what you can do with the API, where the user navigates forward one step:

We've also added more features to the Indoor Maps feature of the API. You can turn the default floor picker off - useful if you want to build your own. You can also detect when a new building comes into focus, and find the currently-active building and floor. Great if you want to show custom markup for the active level, for example.


Activity Recognition

And while we are on the topic of maps, let’s turn to some news in the Location API. For those of you that have used this API, you may have seen the ability already there to detect if the device is in a vehicle, on a bicycle, on foot, still, or tilting.


In this release, two new activity detectors have been added: Running, and Walking. So a great opportunity to expand your app to be even more responsive to your users. And for you that have not worked with this capability earlier, we hardly need to tell the cool things you can do with it. Just imagine combining this capability with features in Maps, Games Services, and other parts of Location...


Games Services Update

In the 4.3 release we introduced Game Gifts, which allows you to request gifts or wishes. And although there are no external API changes this time, the default requests sending UI has been extended to now allow the user to select multiple Game Gifts recipients. For your games this means more collaboration and social engagement between your players.


Mobile Ads

For Mobile Ads, we’ve added new APIs for publishers to display in-app promo ads, which enables users to purchase advertised items directly. We’re offering app developers control of targeting specific user segments with ads, for example offering high-value users an ad for product A, or new users with an ad for product B, etc.


With these extensions, users can conveniently purchase in-app items that interest them, advertisers can reach consumers, and your app connects the dots; a win-win-win in other words.


Wallet Fragments

For the Instant Buy API, we’ve now reduced the work involved to place a Buy With Google button in an app. The WalletFragment API introduced in this release makes it extremely easy to integrate Google Wallet Instant Buy with an existing app. Just configure these fragments and add them to your app.

And that’s another release of Google Play services. The updated Google Play services SDK is now available through the Android SDK manager. Coming up in June is Google I/O, no need to say more…


For the release video, please see:

DevBytes: Google Play services 4.4


For details on the APIs, please see:

New Features in Google Play services 4.4


Followers