Showing posts with label Android Wear. Show all posts

Thursday, 12 March 2015

A new reference app for multi-device applications

It is now possible to bring the benefits of your app to your users wherever they happen to be, no matter what device they have near them. Today we’re releasing a reference sample that shows how to implement such a service with an app that works across multiple Android form-factors. This sample, the Universal Music Player, is a bare-bones but functional reference app that supports multiple devices and form factors in a single codebase. It is compatible with Android Auto, Android Wear, and Google Cast devices. Give it a try and easily adapt your own app for wherever your users are, be that a phone, watch, TV, car, or more!


Playback controls and album art in the lock screen.

On the application toolbar, the Google Cast icon.


Controlling playback through Android Auto


Controlling playback on an Android Wear watch


This sample uses a number of new features in Android 5.0 Lollipop, like MediaStyle notifications, MediaSession and MediaBrowserService. They make it easy to implement media browsing and playback on multiple devices with a single version of your app.


Check out the source code and let your users enjoy your app from wherever they like.


Posted by Renato Mangini, Senior Developer Platform Engineer, Google Developer Platform Team

Wednesday, 18 February 2015

Building for Android Wear: Depth and Flexibility

Posted by Timothy Jordan, Developer Advocate


With so many recent updates and improvements to Android Wear, it's high time to share an updated overview of the platform. We're certainly not done—there's a lot more to come—but this is the picture today as you start or continue developing your groundbreaking Android Wear user experiences.


The Android Wear platform emphasizes depth and flexibility. Built on Android, it allows developers to use familiar APIs to create useful, performant, and imaginative apps that run directly on the watch. In the spirit of Android, you have the freedom to make substantial changes to the user experience, including the creation of custom watch faces. There are three main categories of experiences you can build: apps, custom watch faces, and notifications.


Apps


Apps that are built for Android Wear run directly on the watch and can do nearly anything a phone can, from tracking your run to giving you a little entertainment while waiting for the bus. Some even work without a connection to the phone, such as fitness and music apps. There are libraries to help you move data between the phone and the wearable, as well as create stunning and adaptable UIs. Here's a list of some of the great features you have access to:


Feature
Documentation
Full screen activities with touch eventsCreating Custom UIs for Wear Devices
Notifications and custom actionsUI Patterns for Android Wear
Custom Watch facesCreating Watch Faces
Layouts for round and square devicesCreating Custom UIs for Wear Devices
OpenGLDisplaying Graphics with OpenGL ES
Sensors
  • Accelerometer

  • Gyroscope

  • Compass

  • Barometer

  • Heart rate sensor
SensorManager
HapticsVibrator
MicrophoneAudioRecord
Voice actionsAdding Voice Capabilities
GPSDetecting Location on Android Wear
Offline storing of data / musicTransferring Assets
Media playback controlsMediaSession, MediaController
Framework based on Android 5.0 API 21Android 5.0 APIs
Standalone or synchronized appsSending and Syncing Data


Watch Faces


The ability to create custom watch faces gives you direct access to the most prominent UI element on a user's most personal device. The API is simple enough to build watch faces quickly and flexible enough to allow personalization. Again, given the depth and flexibility of the Android platform, you can create something for the user that's both beautiful and packed with unique features.


The development journey starts with the simplicity of bringing your design to the wrist. At the core of the watch face API is the onDraw method that allows you to draw whatever design you can think of to the canvas at a high enough frame rate to deliver fluid animation. This will come through at full fidelity while the watch is in interactive mode.


At other times, when the watch is in ambient mode, you're able to draw a more discreet version of the watch face. Additional preferences can be set to arrange the system UI elements appropriately for your design. Once those basics are covered, the limits are your imagination! You can go further with additions like the moon phase, current weather, or fitness stats. Watchmakers call these items "complications" -- but with Android they're hardly complicated. Once you have the data, just draw it on the canvas as you did the time.


Notifications


Of course, Android Wear Notifications are the easiest way to get started in the world of wearables. If you've got an Android app with notifications -- they already work on a Wear watch. If you've already enhanced your notification with actions, this is even better and also automatically already works. You can take things further with Wear-specific functionality like Stacks, Pages, and Voice Replies that make your notifications richer experiences on the wrist.


The user experiences you build for Wear get to take advantage of the power and flexibility of the Android platform. It's easy to get started and possible to create truly groundbreaking UI for your users. Together, we can create an ecosystem of user experiences as diverse as the watches they run on and the people who wear them.


Check out the developer videos and documentation for more, and share your thoughts on the Android Wear Developers community. We can’t wait to see the innovative user experiences you will build on Android Wear.


Wednesday, 11 February 2015

The Guardian — Understanding and engaging mobile users

Posted by Leticia Lago, Google Play team


The Guardian is a global news organization with one of the world's largest quality English-speaking news websites, theguardian.com. It has more than 100 million monthly unique browsers and app users, two thirds of which come from outside the UK. With a longstanding reputation for agenda-setting journalism, the publication is most recently renowned for its Pulitzer Prize and Emmy-winning coverage of the disclosures made by whistleblower Edward Snowden. The Guardian’s early adoption of a digital-first policy and continued digital innovation means it has also become a respected name among developers and tech audiences. In the last year, it has launched a redesigned app and new website and been among a handful of publishers to develop its own Glassware.


The Guardian app is taking advantage of unique Google Play and Android features to drive user engagement. Their mobile app readers are now 10 to 20 times more engaged than their average web users. Improving engagement has also helped them lift the rating for their app from 4.0 to 4.4 on Google Play.


Anthony Sullivan, Director of Product, and Tom Grinsted, Product Manager, share some best practices for increasing app engagement in this video.


To learn more, be sure to check out these resources to better engage your users:


  • Convert installs to active users [video] — hear from Matteo Vallone, Partner Development Manager for Google Play, about the best practices for engaging and retaining users through intents, identity, context, and rich notifications as well as delivering a cross-platform user experience.

  • Adding Wearable Features to Notifications [tutorial] — learn how to add notifications to Android Wear devices, including how to make use of the Wear notification features: voice commands, stacks, and pages.

  • Beta testing [help] — discover how to make use of the alpha and beta testing features offered by Google Play, and get feedback from real users.

  • Build your community (of testers) [guide] — get advice on how to build communities on G+ or other social networks, then tap into their skills and enthusiasm to help with testing your app.


Wednesday, 4 February 2015

Trulia sees 30% more engagement using notifications and further innovates with Android Wear

Posted by Laura Della Torre, Google Play team


Trulia’s mission is to make it as easy as possible for home buyers, sellers, owners and renters to navigate the real estate market. Originally a website-based company, Trulia is keenly aware that its users are migrating to mobile. Today, more than 50 percent of Trulia’s business comes from mobile and growth shows no sign of slowing, so they know that’s where they need to innovate.


In the following video, Jonathan McNulty, VP of Consumer Product, and Lauren Hirashima, Mobile Product Manager, at Trulia, talked about how the company successfully leveraged notifications on Android to increase app engagement by 30 percent and has seen 2x the amount of engagement on Android relative to other platforms:


Trulia continues to focus on improving their mobile experience, using Google’s geo-fencing technology to create Nearby Home Alerts, which lets users know when they walk near a new listing. Combined with Android Wear, Trulia now makes it possible for users to see details and photos about a property and call or email the agent, all directly from their watch.


Find out more about using rich notifications on Android and developing for Android Wear. And check out The Secrets to App Success on Google Play (ebook) which contains a chapter dedicated to the best practices and tools you can use to increase user engagement and retention in your app.


Tuesday, 27 January 2015

Android Wear & QR Code: Putting Users through the Fast Track

Posted by Hoi Lam, Developer Advocate


Rushing onto a train, entering a concert, or simply ordering a coffee, we have all seen users (or ourselves) rummaging through their wallets or mobile app trying to get the right boarding pass, ticket or loyalty card. With Android Wear and a few lines of code in your mobile app, this can all work like magic.


What’s new in the Android Support Library


While QR Code images could be attached to a notification since the first release of the Android Wear platform, developers have asked about two situations which they would like to see improve:


  1. With circular displays, it is hard for developer to know if the QR code is displayed in it’s entirety and not cropped.

  2. To conserve battery, Android Wear switches off the screen after five seconds of inactivity. However, this makes it hard for the user to ensure that the QR code is still displayed on their wrist when they reach the front of the queue.


With the latest support library, we have added two additional methods to WearableExtender to give developers more control over how background images are displayed in notifications. These new APIs can be used in a number of scenarios, we will focus on the QR code use case in this post:


  • Ensure the image is not cropped - setHintAvoidBackgroundClipping(true)

  • With this new method, developers can ensure that the entire QR code is always visible.


    Wrong:
    setHintAvoidBackgroundClipping
    (false)
    // this is the Default
    Right:
    setHintAvoidBackgroundClipping
    (true)


  • Ensure the QR code is still displayed when the user gets to the front of the queue - setHintScreenTimeout(timeInMS)

  • This new method enables developers to set a timeout that makes sense for their specific use case.


Design Best Practices


We have experimented with a number of customization options with QR codes and here are some of the lessons learnt:


Dos


  • Do test with your equipment - Before deploying, test with your QR code readers to ensure that the QR code displayed on the wearable works with your equipment.

  • Do use black and white QR codes - This ensures maximum contrasts and makes it easier for the reader to read the information.

  • Do display only the core information in the text notification - Remember that less is more. Glanceability is important for wearables.

  • Do test with both round and square watches - The amount of text can be displayed on the notification varies especially dependent on the form factor (square and circular).

  • Do brand with icon - On the main notification in the Android Wear stream, developers can set a full color icon using setLargeIcon to brand your notification.

  • Do convey additional information using background - To achieve an even better result, consider setting context sensitive backgrounds through setBackground, such as a photo of the destination for the train or a picture of the stadium.

  • Do use QR codes which are 400x400 pixels or larger - In line with other background images, the recommended minimum size for QR code is 400x400 pixels.


Don'ts


  • Do not brand the QR code - The screen real estate is limited on Android Wear and using some of this for branding may result in the QR code not working correctly.

  • Do not use anything other than grey or default theme color for notification text - Although Android Wear notifications support basic text formatting such as setting text color, this should be used in moderation with the color set to default or grey. The reason is that the Holo theme for Android 4.x has a default background of black whereas Material Design theme for Android 5+ including Android Wear has a white background. This makes it hard for the colour to work for both themes. Bold and Italic are fine formatting choices.


Android Wear is for people on the move


Using QR codes on Android Wear is a very delightful experience. The information that the user needs is right on their wrist at the right time in the right place. With the new APIs, you can now unlock more doors than ever before and give users an easier time with check in on the go.


Sample code can be downloaded from this repository.


Join the discussion on


+Android Developers

Thursday, 18 December 2014

Making a performant watch face

Posted by Hoi Lam, Developer Advocate, Android Wear


What’s a better holiday gift than great performance? You’ve got a great watch face idea -- now, you want to make sure the face you’re presenting to the world is one of care and attention to detail.


At the core of the watch face's process is an onDraw method for canvas operations. This allows maximum flexibility for your design, but also comes with a few performance caveats. In this blog post, we will mainly focus on performance using the real life journey of how we optimised the Santa Tracker watch face, more than doubling the number of fps (from 18 fps to 42 fps) and making the animation sub-pixel smooth.


Starting point - 18 fps


Our Santa watch face contains a number of overlapping bitmaps that are used to achieve our final image. Here's a list of them from bottom to top:


  1. Background (static)

  2. Clouds which move to the middle

  3. Tick marks (static)

  4. Santa figure and sledge (static)

  5. Santa’s hands - hours and minutes

  6. Santa’s head (static)


The journey begins with these images...


Large images kill performance (+14 fps)


Image size is critical to performance in a Wear application, especially if the images will be scaled and rotated. Wasted pixel space (like Santa’s arm here) is a common asset mistake:


Before: 584 x 584 = 341,056 pixelsAfter: 48*226 = 10,848 (97% reduction)


It's tempting to use bitmaps from the original mock up that have the exact location of watch arms and components in absolute space. Sadly, this creates problems, like in Santa's arm here. While the arm is in the correct position, even transparent pixels increase the size of the image, which can cause performance problems due to memory fetch. You'll want to work with your design team to extract padding and rotational information from the images, and rely on the system to apply the transformations on our behalf.


Since the original image covers the entire screen, even though the bitmap is mostly transparent, the system still needs to check every pixel to see if they have been impacted. Cutting down the area results in significant gains in performance. After correcting both of the arms, the Santa watch face frame rate increased by 10 fps to 28 fps (fps up 56%). We saved another 4 fps (fps up 22%) by cropping Santa’s face and figure layer. 14 fps gained, not bad!


Combine Bitmaps (+7 fps)


Although it would be ideal to have the watch tick marks on top of our clouds, it actually does not make much difference visually as the clouds themselves are transparent. Therefore there is an opportunity to combine the background with the ticks.


+


When we combined these two views together, it meant that the watch needed to spend less time doing alpha blending operations between them, saving precious CPU time. So, consider collapsing alpha blended resources wherever we can in order to increase performance. By combining two full screen bitmaps, we were able to gain another 7 fps (fps up 39%).


Anti-alias vs FilterBitmap flags - what should you use? (+2 fps)


Android Wear watches come in all shapes and sizes. As a result, it is sometimes necessary to resize a bitmap before drawing on the screen. However, it is not always clear what options developers should select to make sure that the bitmap comes out smoothly. With canvas.drawBitmap, developers need to feed in a Paint object. There are two important options to set - they are anti-alias and FilterBitmap. Here’s our advice:


  • Anti-alias does not do anything for bitmaps with transparent edges. We often switch on the anti-alias option by default as developers when we are creating a Paint object. However, this option only really makes sense for vector objects. For bitmaps, this is used to blend the rectangular edges if it is rotated or skewed and it has no impact if the edge pixels are transparent (as we would imagine most watch face arms would be). The hand on the left below has anti-alias switched on, the one on the right has it switched off. So turn off anti-aliasing for bitmaps to gain performance back. For our watch face, we gained another 2 fps (fps up 11%) by switching this option off.


  • Switch on FilterBitmap for all bitmap objects which are on top of other objects - this option smooths the edges when drawBitmap is called. This should not be confused with the filter option on Bitmap.createScaledBitmap for resizing bitmaps. We need both to be turned on. The bitmaps below are the magnified view of Santa’s hand. The one on the left has FilterBitmap switched off and the one on the right has FilterBitmap switched on.


Eliminate expensive calls in the onDraw loop (+3 fps)


onDraw is the most critical function call in watch faces. It's called for every drawable frame, and the actual painting process cannot move forward until it's finished. As such, our onDraw method should be as light and as performant as possible. Here's some common problems that developers run into that can be avoided:


  1. Do move heavy and common code to a precompute function - e.g. if we commonly grab R.array.cloudDegrees, try doing that in onCreate, and just referencing it in the onDraw loop.

  2. Don’t repeat the same image transform in onDraw - it’s common to resize bitmaps at runtime to fit the screen size but this is not available in onCreate. To avoid resizing the bitmap over and over again in onDraw, override onSurfaceChanged where width and height information are available and resize images there.

  3. Don't allocate objects in onDraw - this leads to high memory churn which will force garbage collection events to kick off, killing frame rates.

  4. Do analyze the CPU performance by using a tool such as the Android Device Monitor. It’s important that the onDraw execution time is short and occurs in a regular period.


Following these simple rules will improve rendering performance drastically.


In the first version, the Santa onDraw routine has a rogue line:


int[] cloudDegrees = 
getResources().getIntArray(R.array.cloudDegrees);


This loads the int array on every call from resources which is expensive. By eliminating this, we gained another 3 fps (fps up 17%).


Sub-pixel smooth animation (-2 fps)


For those keeping count, we should be 44 fps, so why is the end product 42 fps? The reason is a limitation with canvas.drawBitmap. Although this command takes left and top positioning settings as a float, the API actually only deals with integers if it is purely translational for backwards compatibility reasons. As a result, the cloud can only move in increments of a whole pixel resulting in janky animations. In order to be sub-pixel smooth, we actually need to draw and then rotate rather than having pre-rotate clouds which moves towards Santa. This additional rotation costs us 2 fps. However, the effect is worthwhile as the animation is now sub-pixel smooth.


Before - fast but janky and wobbly


for (int i = 0; i < mCloudBitmaps.length; i++) {
float r = centerX - (timeElapsed / mCloudSpeeds[i]) % centerX;
float x = centerX +
-1 * (r * (float) Math.cos(Math.toRadians(cloudDegrees[i] + 90)));
float y = centerY -
r * (float) Math.sin(Math.toRadians(cloudDegrees[i] + 90));
mCloudFilterPaints[i].setAlpha((int) (r/centerX * 255));
Bitmap cloud = mCloudBitmaps[i];
canvas.drawBitmap(cloud,
x - cloud.getWidth() / 2,
y - cloud.getHeight() / 2,
mCloudFilterPaints[i]);
}


After - slightly slower but sub-pixel smooth


for (int i = 0; i < mCloudBitmaps.length; i++) {
canvas.save();
canvas.rotate(mCloudDegrees[i], centerX, centerY);
float r = centerX - (timeElapsed / (mCloudSpeeds[i])) % centerX;
mCloudFilterPaints[i].setAlpha((int) (r / centerX * 255));
canvas.drawBitmap(mCloudBitmaps[i], centerX, centerY - r,
mCloudFilterPaints[i]);
canvas.restore();
}


Before: Integer translation values create janky, wobbly animation. After: smooth sailing!


Quality on every wrist


The watch face is the most prominent UI element in Android Wear. As craftspeople, it is our responsibility to make it shine. Let’s put quality on every wrist!


Thursday, 11 December 2014

New Code Samples for Lollipop

Posted by Trevor Johns, Developer Programs Engineer


With the launch of Android 5.0 Lollipop, we’ve added more than 20 new code samples demonstrating how to implement some of the great new features of this release. To access the code samples, you can easily import them in Android Studio 1.0 using the new Samples Wizard.


Go to File > Import Sample in order to browse the available samples, which include a description and preview for each. Once you’ve made your selection, select “Next” and a new project will be automatically created for you. Run the project on an emulator or device, and feel free to experiment with the code.


Samples Wizard in Android Studio 1.0


Newly imported sample project in Android Studio


Alternatively, you can browse through them via the Samples browser on the developer site. Each sample has an Overview description, Project page to browse app file structure, and Download link for obtaining a ZIP file of the sample. As a third option, code samples can also be accessed in the SDK Manager by downloading the SDK samples for Android 5.0 (API 21) and importing them as existing projects into your IDE.


Sample demonstrating transition animations


Material Design


When adopting material design, you can refer to our collection of sample code highlighting material elements:


For additional help, please refer to our design checklist, list of key APIs and widgets, and documentation guide.


To view some of these material design elements in action, check out the Google I/O app source code.


Platform


Lollipop brings the most extensive update to the Android platform yet. The Overview screen allows an app to surface multiple tasks as concurrent documents. You can include enhanced notifications with this sample code, which shows you how to use the lockscreen and heads-up notification APIs.


We also introduced a new Camera API to provide developers more advanced image capture and processing capabilities. These samples detail how to use the camera preview and take photos, how to record video, and implement a real-time high-dynamic range camera viewfinder.


Elsewhere, Project Volta encourages developers to make their apps more battery-efficient with new APIs and tools. The JobScheduler sample demonstrates how you can schedule background tasks to be completed later or under specific conditions.


For those interested in the enterprise device administration use case, there are sample apps on setting app restrictions and creating a managed profile.


Android Wear


For Android Wear, we have a speed tracker sample to show how to take advantage of GPS support on wearables. You can browse the rest of the Android Wear samples too, and here are some highlights that demonstrate the unique capabilities of wearables, such as data synchronization, notifications, and supporting round displays:


Android TV


Extend your app for Android TV using the Leanback library described in this training guide and sample.


To try out a game that is specifically optimized for Android TV, download Pie Noon from Google Play. It’s an open-source game developed in-house at Google that supports multiple players using Bluetooth controllers or touch controls on mobile devices.


Android Auto


For the use cases highlighted in the Introduction to Android Auto DevByte, we have two code samples. The Media Browser sample (DevByte) demonstrates how easy it is to make an audio app compatible with Android Auto by using the new Lollipop media APIs, while the Messaging sample (DevByte) demonstrates how to implement notifications that support replies using speech recognition.


Google Play services


Since we’ve discussed sample resources for the Android platform and form factors, we also want to mention that there are existing samples for Google Play services. With Google Play services, your app can take advantage of the latest Google-powered APIs such as Maps, Google Fit, Google Cast, and more. Access samples in the Google Play services SDK or visit the individual pages for each API on the developer site. For game developers, you can reference the Google Play Games services samples for how to add achievements, leaderboards, and multiplayer support to your game.


Check out a sample today to help you with your development!


Wednesday, 10 December 2014

Watch Face API Now Available for Android Wear

Posted by Wayne Piekarski, Developer Advocate


We’re pleased to announce that the official Android Wear Watch Face API is now available for developers. Watch faces give users even more ways to express their personal style, while creating an opportunity for developers to customize the most prominent UI feature of the watches. Watch faces have been the most requested feature from users and developers alike, and we can’t wait to see what you build for them.


An Introduction to Watch Faces for Android Wear by Timothy Jordan


Design and development


To get started, first learn about Designing Watch Faces, and then check out the Creating Watch Faces training class. The WatchFace Sample available online and in the Android Studio samples manager also provides a number of different examples to help you jump right in. For a quick overview, you can also watch the Watch Faces for Android Wear DevByte video above.


Watch faces are services that run from your wearable app, so you can provide one or multiple watch faces with a single app install. You can also choose to have configuration activities on the phone or watch, for example to let a user change between 12 and 24-hour time, or to change the watch face’s background. You can use OpenGL to provide smooth graphics, and a background service to pull in useful data like weather and calendar events. Watch faces can be analog, or digital, or display the time in some new way that hasn’t been invented yet––it’s up to you.


Updates to existing devices


Over the next week, the latest release of Android Wear, based on Android 5.0 and implementing API 21, will roll out to users. All Android Wear devices will be updated to Android 5.0 via an over-the air (OTA) update. The update allows users to manage and configure watch faces in the Android Wear app on their phone, and install watch faces from Google Play. Any handheld device running Android 4.3 or later will continue to work with all Android Wear devices.


Upgrade your watch faces


Developers are incredibly resourceful and we’re impressed with the watch faces you were able to create without any documentation at all. If you’ve already built a watch face for Android Wear using an unofficial approach, you should migrate your apps to the official API. The official API ensures a consistent user experience across the platform, while giving you additional information and controls, such as letting you know when the watch enters ambient mode, allowing you to adjust the position of system UI elements, and more. Using the new API is also necessary for your app to be featured in the Watch Faces collection on Google Play.


Deployment of watch faces to Google Play


We recommend you update your apps on Google Play as soon as the Android Wear 5.0 API 21 OTA rollout is complete, which we’ll announce on the Android Wear Developers Google+ community. It’s important to wait until the OTA rollout is complete because a Watch Face requiring API 21 will not be visible on a watch running API 20. Once your user gets the OTA, then the watch face will become visible. If you want to immediately launch your updates during the OTA rollout, make sure you set minSdkVersion to 20 in your wearable app, otherwise the app will fail to install for pre-OTA users. Once the rollout is complete, please transition your existing watch faces to the new API by January 31, 2015, at which point we plan to remove support for watch faces that don't use the official API.


Android Wear apps on Google Play


Starting today, you can submit any of your apps for designation as Android Wear apps on Google Play by following the Distributing to Android Wear guidelines. If your apps follow the criteria in the Wear App Quality checklist and are accepted as Wear apps on Play, it will be easier for Android Wear users to discover them. To opt-in for Android Wear review, visit the Pricing & Distribution section of the Google Play Developer Console.


In the few short months since we’ve launched Android Wear, developers have already written thousands of apps, taking advantage of custom notifications, voice actions, and fully native Android capabilities. Thanks to you, users have infinite ways to personalize their watches, choosing from six devices, a range of watch bands, and thousands of apps. With support for custom watch faces launching today, users will have even more choices in the future. These choices are at the heart of a rich Android Wear ecosystem and as we continue to open up core features of the platform to developers, we can’t wait to see what you build next.


Friday, 3 October 2014

Tips for Error Handling with Android Wear APIs

By +Wayne Piekarski, Developer Advocate, Android Wear


For developers using the Android Wear APIs in Google Play services, it is important to correctly handle all the error conditions that can occur on legacy phones or when users do not have a wearable device. This post describes the best practice in handling error conditions with the GoogleApiClient connect() method. If you do not implement this correctly, your existing application functionality may fail for non-wearable users.


There are two ways that the connect() method can return ConnectionResult.API_UNAVAILABLE for wearable support with Google Play services:


  • When requesting Wearable.API on any device running Android 4.2 (API level 17) or earlier

  • When requesting Wearable.API when no Android Wear companion application or device is available


Google Play services provides a wide range of useful features such as integration with Google Drive, Wallet, Google+, and Google Play games services (just to name a few!). During initialization, the application uses GoogleApiClient.Builder() to make calls to addApi() to request the features that are necessary. The connect() method is then called to establish a connection to the Google Play services library, and it can return error codes if any API is not available.


If you request multiple APIs from a single GoogleApiClient, such as Drive and Wear, and the Wear support returns API_UNAVAILABLE, then the Drive request will also fail. Since Wear support is not guaranteed to be available on all devices, you should make sure to use a separate client for this request.


The best practice for developers is to implement two separate GoogleApiClient connections:


  • One connection for Android Wear support, and

  • A separate connection for all of the other APIs you need


This will ensure that the functionality of your app will remain for all users, whether or not there is wearable support available on their devices, as well as on older legacy devices.

It's important that you implement this best practice immediately, because your current users may be affected if not handled correctly in your app.


Wednesday, 24 September 2014

Allthecooks on Android Wear

By Hoi Lam, Developer Advocate, Android Wear


The best cooking companion since the apron?


Android Wear is designed for serving up useful information at just the right time and in the right place. A neat example of this is Allthecooks Recipes. It gives you the right recipe, right when you need it.


This app is a great illustration of the four creative visions for Android Wear:


  1. Launched automatically

  2. Glanceable

  3. Suggest and demand

  4. Zero or low interaction


Allthecooks also shows what developers can do by combining both the power of the mobile device and the convenience of Android Wear.


Pick the best tool for the job


One particularly well-designed aspect of Allthecooks is their approach to the multi-device experience. Allthecooks lets the user search and browse the different recipes on their Android phone or tablet. When the user is ready, there is a clearly labelled blue action link to send the recipe to the watch.


The integration is natural. Using the on-screen keyboard and the larger screen real estate, Allthecooks is using the best screen to browse through the recipes. On the wearables side, the recipe is synchronised by using the DataApi and is launched automatically, fulfilling one of the key creative visions for Android Wear.


The end result? The mobile / Wear integration is seamless.


Thoughtful navigation


Once the recipe has been sent to the Android Wear device, Allthecooks splits the steps into easily glanceable pages. At the end of that list of steps, it allows the user to jump back to the beginning with a clearly marked button.


This means if you would like to browse through the steps before starting to cook, you can effortlessly get to the beginning again without swiping through all the pages. This is a great example of two other points in the vision: glanceable and zero or low interaction.


A great (cooking) assistant


One of the key ingredients of great cooking is timing, and Allthecooks is always on hand to do all the inputs for you when you are ready to start the clock. A simple tap on the blue “1” and Allthecooks will automatically set the timer to one hour. It is a gentle suggestion that Allthecooks can set the timer for you if you want.


Alternatively, if you want to use your egg timer, why not? It is a small detail but it really demonstrates the last and final element of Android Wear’s vision of suggest and demand. It is an ever ready assistant when the user wants it. At the same time, it is respectful and does not force the user to go down a route that the user does not want.


It’s about the details


Great design is about being user-centric and paying attention to details. Allthecooks could have just shrunk their mobile app for wear. Instead the Allthecooks team put a lot of thoughts into the design and leveraged all four points of the Android Wear creative vision. The end result is that the user can get the best experience out of both their Android mobile device and their Android Wear device. So developers, what will you be cooking next on Android Wear?


For more inspiring Android Wear user experiences, check out the Android Wear collection on Google Play!


Wednesday, 17 September 2014

Messaging on Android Wear

By Timothy Jordan, Developer Advocate


Sending messages on Android Wear feels as easy as it was to pass notes back in school. Remember when your friends always felt nearby? That feeling is why I love staying in touch with friends and family using my wearable.


Your messaging app likely already works on Android Wear. With just a few more lines of code you can unlock simple but powerful features that let your users communicate even more effortlessly.


Message notifications for free


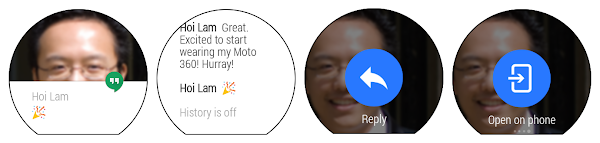
If your Android app uses notifications to let the user know about new messages, these will work automatically on their wearable. That is, when you build notifications with the NotificationCompat.Builder class, the system takes care of displaying them properly, whether they appear on a handheld or wearable. Also, an "Open on phone" action will be added so it's easy for the user to reply via the app on their handheld.


Google+ Hangouts message.


Reply like a champ


Messages on Wear get really exciting when you can reply directly from the watch with your voice. In addition to being super convenient, this always gives me a Dick Tracy thrill… but maybe that's just me. =]

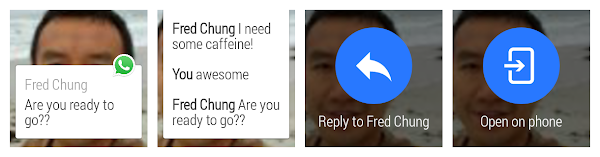
To add this functionality, it's as simple as adding an action to the notification via WearableExtender that includes a RemoteInput to your notification. After the user replies, you'll just grab their voice input as a string from the RemoteInput included in the Intent. You can even include text responses the user can easily select from a list by passing an array of them to the setChoices method of the RemoteInput. More details and code can be found here.


WhatsApp message with the reply by voice action.


See who is texting


Messages are more meaningful when you are connected to the sender. That's why we recommend you include the photo of the sender as the background of the notification. As soon as the user taps into the message, they also see who it's from, which will make it matter more (or maybe that other thing, depending on who it is).


You should add a photo with a resolution of at least 400x400, but we recommend 640x400. With the larger size, the background will be given parallax scrolling. If the background is to be included in the apk, place it in the res/drawable-nodpi directory. Then call setBackground() on your WearableExtender and add it to your notification. More details and code can be found here.


Path Talk message with a clear picture of the sender.


Custom actions


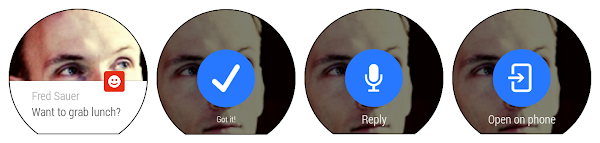
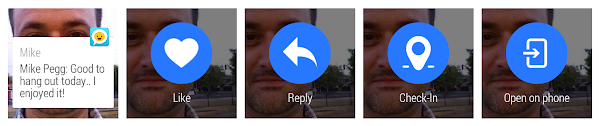
Basic notifications with reply by voice and a good background image are the most important parts to get done right away. But why stop there? It's easy to extend the unique parts of your service to the wearable. A simple first step is adding in a custom action the way Omlet does. These are just actions defined with the WearableExtender that raise an intent on the handheld.


Omlet includes two extra actions with every message: Like and Check-In. Check-In sends along the user's current location.


Custom Layouts


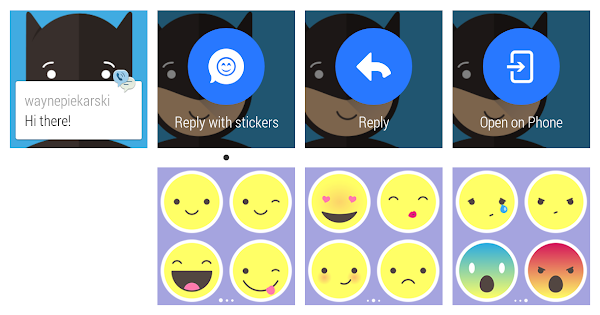
Custom interaction on the wearable, like the following example from TextMe, is straightforward to implement. They have what appears to be a simple notification with an action that allows the user to select an emoticon. However, to show this emoticon picker, they are actually issuing a notification from the wearable. The round trip looks something like this:


  1. The handheld gets a new message, issues a notification setLocalOnly(True), and sends a message to the wearable using the Data Layer API

  2. The wearable receives that message using the WearableListenerService and issues a custom notification with a PendingIntent to launch an activity when the user views the notification

  3. That activity has a custom layout defined with the Wearable UI Library

  4. Once the user selects an emoticon, the wearable sends a message back to the handheld

  5. The handheld receives that message and sends it along to the server


Custom layouts are documented in more depth here.


TextMe allows users to reply with a quick emoticon.


Next steps


Make your messaging service awesome by providing rich functionality on the user's wearable. It's easy to get started and easy to go further. It all starts at developer.android.com/wear.


Thursday, 17 July 2014

Porting Your Android Wear Developer Preview Code to the Latest Support Library

Today’s post on #AndroidWear is from +Wayne Piekarski.


Now that the full Android Wear SDK is available, it’s time to port your existing wearable-enabled notification code from the Developer Preview. In the process, you’ll switch to using the latest Android support library, and there are some small API changes that will require you to update your code. This article will show you how to update my previous code samples that were released earlier for stacks and pages, which you can use to guide the conversion of your own code as well.


To get started with an existing project in Android Studio, you should update to the 0.8 or later release. You also need to make sure you’ve downloaded the Google Support Library version 20 or later from the SDK Manager. Since this is only a notification-based example, there’s no need to download the full Android Wear SDK, which is only needed if you want to create an APK to run on the wearable device.


Unix diff output is used to show the necessary changes in an easy to understand way. Do not copy the + or - symbols at the start of each line, and ignore the lines starting with @@ which are used to indicate the line number that changed. For the curious, I used the following command to generate the diff output from the last commit in my GIT repository (the -U1 shows one line of context to keep the output simple):


git show HEAD -U1


Gradle changes


To add the new support-v4 library, you need to edit your build.gradle file like so:


@@ -24,2 +24,3 @@ dependencies {
compile 'com.android.support:appcompat-v7:19.+'
+ compile 'com.android.support:support-v4:20.0+'
}


Make sure you remove the wearable-preview-support.jar that was provided with the Developer Preview from your libs directory and build.gradle file, since these features are now in the standard support library.


Package imports


Since the APIs and package names have changed, the import statements at the top of MainActivity.java need to be adjusted like this:


@@ -7,3 +7,2 @@ import android.view.MenuItem;
-import android.support.v4.app.NotificationCompat;
import android.app.Notification;
@@ -13,4 +12,9 @@ import android.graphics.Bitmap;
import android.graphics.BitmapFactory;
-import android.preview.support.v4.app.NotificationManagerCompat;
-import android.preview.support.wearable.notifications.WearableNotifications;

+import android.support.v4.app.NotificationCompat;
+import android.support.v4.app.NotificationManagerCompat;
+
+// Extra dependencies needed for the pages example
+import java.util.ArrayList;
+import java.util.List;
+import android.support.v4.app.NotificationCompat.BigTextStyle;


Stacking notifications


Since the preview SDK, we have simplified how notifications are implemented. The existing NotificationCompat.Builder() was extended to support groups directly, instead of a separate WearableNotifications class. The steps are a lot simpler, as can be seen with the following changes to showStackNotifications():


@@ -63,3 +67,3 @@ public class MainActivity extends ActionBarActivity {
// Group notification that will be visible on the phone
- NotificationCompat.Builder builderG = new NotificationCompat.Builder(this)
+ Notification summaryNotification = new NotificationCompat.Builder(this)
.setContentTitle("2 Pet Notifications")
@@ -67,5 +71,5 @@ public class MainActivity extends ActionBarActivity {
.setSmallIcon(R.drawable.ic_launcher)
- .setLargeIcon(bitmapMila);
- Notification summaryNotification = new WearableNotifications.Builder(builderG)
- .setGroup(GROUP_KEY_MESSAGES, WearableNotifications.GROUP_ORDER_SUMMARY)

+ .setLargeIcon(bitmapMila)
+ .setGroup(GROUP_KEY_MESSAGES)
+ .setGroupSummary(true)
.build();

@@ -76,3 +80,3 @@ public class MainActivity extends ActionBarActivity {
PendingIntent.getActivity(this, notificationId+1, viewIntent1, 0);
- NotificationCompat.Builder builder1 = new NotificationCompat.Builder(this)
+ Notification notification1 = new NotificationCompat.Builder(this)
.addAction(R.drawable.ic_action_done, "Treat Fed", viewPendingIntent1)
@@ -81,4 +85,3 @@ public class MainActivity extends ActionBarActivity {
+ "Can we have steak?")
- .setSmallIcon(R.drawable.ic_launcher);
- Notification notification1 = new WearableNotifications.Builder(builder1)

+ .setSmallIcon(R.drawable.ic_launcher)
.setGroup(GROUP_KEY_MESSAGES)
@@ -89,3 +92,3 @@ public class MainActivity extends ActionBarActivity {
PendingIntent.getActivity(this, notificationId+2, viewIntent2, 0);
- NotificationCompat.Builder builder2 = new NotificationCompat.Builder(this)
+ Notification notification2 = new NotificationCompat.Builder(this)
.addAction(R.drawable.ic_action_done, "Water Filled", viewPendingIntent2)
@@ -93,4 +96,3 @@ public class MainActivity extends ActionBarActivity {
.setContentText("Can you refill our water bowl?")
- .setSmallIcon(R.drawable.ic_launcher);
- Notification notification2 = new WearableNotifications.Builder(builder2)

+ .setSmallIcon(R.drawable.ic_launcher)
.setGroup(GROUP_KEY_MESSAGES)


Page notifications


Page notifications have also changed to use a WearableExtender() class instead of the WearableNotifications class, as can be seen here in showPageNotifications():


@@ -151,3 +153,3 @@ public class MainActivity extends ActionBarActivity {
PendingIntent.getActivity(this, notificationId+1, viewIntent1, 0);
- NotificationCompat.Builder builder1 = new NotificationCompat.Builder(this)
+ Notification notification1 = new NotificationCompat.Builder(this)
.addAction(R.drawable.ic_action_done, "Returned", viewPendingIntent1)
@@ -155,5 +157,4 @@ public class MainActivity extends ActionBarActivity {
.setContentText("You have " + numOverdue + " books due at the library")
- .setSmallIcon(R.drawable.ic_launcher);
- Notification notification1 = new WearableNotifications.Builder(builder1)
- .addPages(extras)

+ .setSmallIcon(R.drawable.ic_launcher)
+ .extend(new NotificationCompat.WearableExtender().addPages(extras))
.build();


Conclusion


If you want to download the final source code of showStackNotifications() and showPageNotifications(), you can download the MainActivity.java file. You can build this file easily by creating a new project in Android Studio, adding the support library, and then copying in this MainActivity.java.


As you can see, porting this previous code over to the latest Android Wear SDK is really easy! It should take you hardly any time at all to get your experimental applications ported over and ready for publishing on the Google Play!


Followers