Thursday, 26 September 2013

Using the Hardware Scaler for Performance and Efficiency

Posted by Hak Matsuda and Dirk Dougherty, Android Developer Relations team


If you develop a performance-intensive 3D game, you’re always looking for ways to give users richer graphics, higher frame rates, and better responsiveness. You also want to conserve the user’s battery and keep the device from getting too warm during play. To help you optimize in all of these areas, consider taking advantage of the hardware scaler that’s available on almost all Android devices in the market today.


How it works and why you should use it


Virtually all modern Android devices use a CPU/GPU chipset that includes a hardware video scaler. Android provides the higher-level integration and makes the scaler available to apps through standard Android APIs, from Java or native (C++) code. To take advantage of the hardware scaler, all you have to do is render to a fixed-size graphics buffer, rather than using the system-provided default buffers, which are sized to the device's full screen resolution.


When you render to a fixed-size buffer, the device hardware does the work of scaling your scene up (or down) to match the device's screen resolution, including making any adjustments to aspect ratio. Typically, you would create a fixed-size buffer that's smaller than the device's full screen resolution, which lets you render more efficiently — especially on today's high-resolution screens.


Using the hardware scaler is more efficient for several reasons. First, hardware scalers are extremely fast and can produce great visual results through multi-tap and other algorithms that reduce artifacts. Second, because your app is rendering to a smaller buffer, the computation load on the GPU is reduced and performance improves. Third, with less computation work to do, the GPU runs cooler and uses less battery. And finally, you can choose what size rendering buffer you want to use, and that buffer can be the same on all devices, regardless of the actual screen resolution.


Optimizing the fill rate


In a mobile GPU, the pixel fill rate is one of the major sources of performance bottlenecks for performance game applications. With newer phones and tablets offering higher and higher screen resolutions, rendering your 2D or 3D graphics on those those devices can significantly reduce your frame rate. The GPU hits its maximum fill rate, and with so many pixels to fill, your frame rate drops.


style="border-radius: 6px;padding:0;margin:0;" />

Power consumed in the GPU at different rendering resolutions, across several popular chipsets in use on Android devices. (Data provided by Qualcomm).


To avoid these bottlenecks, you need to reduce the number of pixels that your game is drawing in each frame. There are several techniques for achieving that, such as using depth-prepass optimizations and others, but a really simple and effective way is making use of the hardware scaler.


Instead of rendering to a full-size buffer that could be as large as 2560x1600, your game can instead render to a smaller buffer — for example 1280x720 or 1920x1080 — and let the hardware scaler expand your scene without any additional cost and minimal loss in visual quality.


Reducing power consumption and thermal effects


A performance-intensive game can tend to consume too much battery and generate too much heat. The game’s power consumption and thermal conditions are important to users, and they are important considerations to developers as well.


As shown in the diagram, the power consumed in the device GPU increases significantly as rendering resolution rises. In most cases, any heavy use of power in GPU will end up reducing battery life in the device.


In addition, as CPU/GPU rendering load increases, heat is generated that can make the device uncomfortable to hold. The heat can even trigger CPU/GPU speed adjustments designed to cool the CPU/GPU, and these in turn can throttle the processing power that’s available to your game.


For both minimizing power consumption and thermal effects, using the hardware scaler can be very useful. Because you are rendering to a smaller buffer, the GPU spends less energy rendering and generates less heat.


Accessing the hardware scaler from Android APIs


Android gives you easy access to the hardware scaler through standard APIs, available from your Java code or from your native (C++) code through the Android NDK.


All you need to do is use the APIs to create a fixed-size buffer and render into it. You don’t need to consider the actual size of the device screen, however in cases where you want to preserve the original aspect ratio, you can either match the aspect ratio of the buffer to that of the screen, or you can adjust your rendering into the buffer.


From your Java code, you access the scaler through SurfaceView, introduced in API level 1. Here’s how you would create a fixed-size buffer at 1280x720 resolution:


surfaceView = new GLSurfaceView(this);
surfaceView.getHolder().setFixedSize(1280, 720);


If you want to use the scaler from native code, you can do so through the NativeActivity class, introduced in Android 2.3 (API level 9). Here’s how you would create a fixed-size buffer at 1280x720 resolution using NativeActivity:


int32_t ret = ANativeWindow_setBuffersGeometry(window, 1280, 720, 0);


By specifying a size for the buffer, the hardware scaler is enabled and you benefit in your rendering to the specified window.


Choosing a size for your graphics buffer


If you will use a fixed-size graphics buffer, it's important to choose a size that balances visual quality across targeted devices with performance and efficiency gains.


For most performance 3D games that use the hardware scaler, the recommended size for rendering is 1080p. As illustrated in the diagram, 1080p is a sweet spot that balances a visual quality, frame rate, and power consumption. If you are satisfied with 720p, of course you can use that size for even more efficient operations.


More information


If you’d like to take advantage of the hardware scaler in your app, take a look at the class documentation for SurfaceView or NativeActivity, depending on whether you are rendering through the Android framework or native APIs.

Watch for sample code on using the hardware scaler coming soon!

Wednesday, 18 September 2013

RenderScript in the Android Support Library


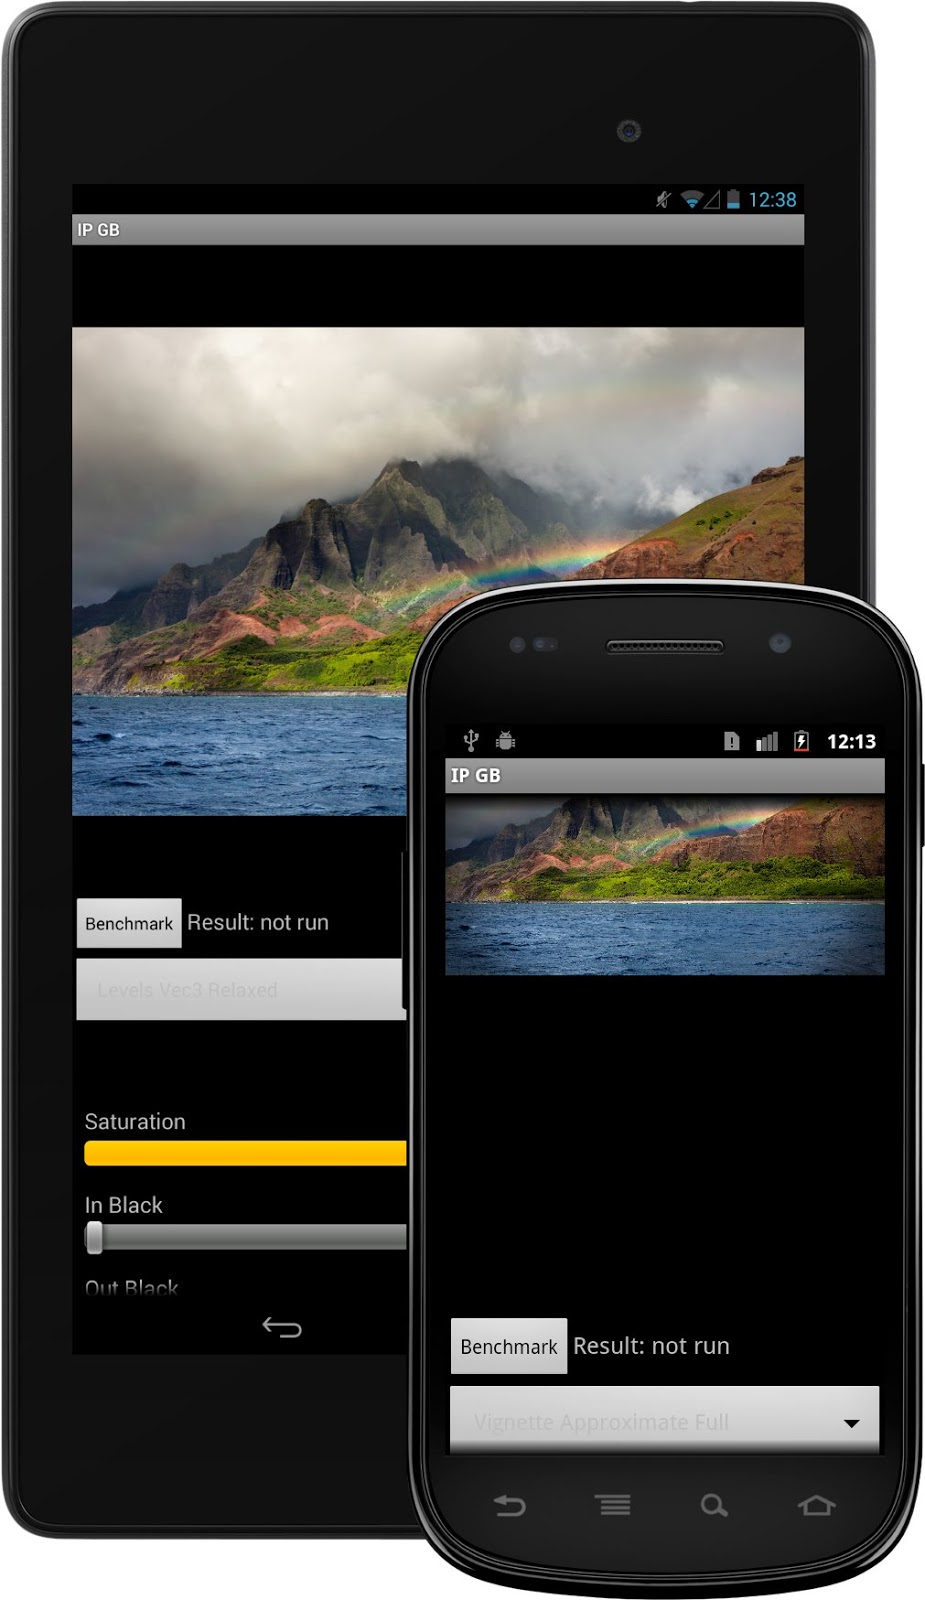
Renderscript Support library on devicesstyle="border-radius: 6px;padding:0;margin:0;" />

The RenderScript Support Library lets you take advantage of the latest RenderScript features on devices running Android 2.2 and later.


Posted by Tim Murray, Android RenderScript team

One of the requests we hear most commonly from developers is to enable more devices to run the latest features of RenderScript. Over the past several releases of Android, we’ve added a ton of functionality to the RenderScript runtime, but the runtime's dependence on the core Android platform version has limited the range of devices that can support that new functionality. We’ve been working on a solution to this since last year, and we’re now ready to share it with all Android developers.


Today we're announcing a new RenderScript Support Library and updated SDK tools that together let you take advantage of RenderScript on plaform versions all the way back to Android 2.2 (Froyo).

With ADT v22.2, SDK Tools v22.2, and Android Build Tools v18.1.0, apps targeting Android 2.2 and later can now make use of almost all of the functionality available natively in RenderScript with Android 4.3. This includes access to the newest RenderScript features such as high-performance intrinsics and the new performance optimizations available to scripts.


Using the RenderScript Support Library


Using the RenderScript Support Library is straightforward. Once you've updated ADT and your SDK tools, there are only two things that you have to do to start using Renderscript in your apps:


  1. In your classes that use RenderScript, import the RenderScript Support Library from android.support.v8.renderscript. If you are already using native RenderScript, you can change your import from android.renderscript to android.support.v8.renderscript.

    import android.support.v8.renderscript.*;


  2. In your project.properties, make sure you’re targeting android-18 and add the following lines:

    renderscript.target=18
    renderscript.support.mode=true
    sdk.buildtools=18.1.0


That’s it! With the RenderScript Support Library, you can continue to use the same APIs from your app as with the native RenderScript package (with a few minor exceptions that we’ll talk about below), and you can use the same features in your own scripts as you would with the latest RenderScript toolchain.

For complete details on how to set up the RenderScript Support Library, see Accessing RenderScript Java APIs.


API and Implementation details


If you'd like to use RenderScript Support Library in your app, there are few things you should know:


  • First, the RenderScript Support Library supports almost all of the RenderScript API functions as the native API that's available in API level and higher. The one notable exception is that Allocation.USAGE_IO_INPUT and Allocation.USAGE_IO_OUTPUT are not currently available in the RenderScript Support Library.


  • Second, devices running Android 4.2 and earlier will always run their RenderScript applications on the CPU, while devices running Android 4.3 or later will run their RenderScript applications on whatever processors are available on that particular device. Because the Support Library versions of the scripts have to be precompiled to support all possible platforms, there is a performance hit when running the precompiled scripts compared to runtime compilation on Android 4.3 due to more restrictions on compiler optimizations.


We’re really pleased with how the RenderScript Support Library has turned out. We've already seen how it performs in a shipping app — it's been part of the photo editor in the Google+ Android app since May 2013, and it’s definitely proven itself in a large and widely used application. We hope you’ll be happy with it too.


Thursday, 29 August 2013

RenderScript Intrinsics


Posted by R. Jason Sams, Android RenderScript Tech Lead


RenderScript has a very powerful ability called Intrinsics. Intrinsics are built-in functions that perform well-defined operations often seen in image processing. Intrinsics can be very helpful to you because they provide extremely high-performance implementations of standard functions with a minimal amount of code.


RenderScript intrinsics will usually be the fastest possible way for a developer to perform these operations. We’ve worked closely with our partners to ensure that the intrinsics perform as fast as possible on their architectures — often far beyond anything that can be achieved in a general-purpose language.


Table 1. RenderScript intrinsics and the operations they provide.


NameOperation
ScriptIntrinsicConvolve3x3, ScriptIntrinsicConvolve5x5Performs a 3x3 or 5x5 convolution.
ScriptIntrinsicBlurPerforms a Gaussian blur. Supports grayscale and RGBA buffers and is used by the system framework for drop shadows.
ScriptIntrinsicYuvToRGBConverts a YUV buffer to RGB. Often used to process camera data.
ScriptIntrinsicColorMatrixApplies a 4x4 color matrix to a buffer.
ScriptIntrinsicBlendBlends two allocations in a variety of ways.
ScriptIntrinsicLUTApplies a per-channel lookup table to a buffer.
ScriptIntrinsic3DLUTApplies a color cube with interpolation to a buffer.


Your application can use one of these intrinsics with very little code. For example, to perform a Gaussian blur, the application can do the following:


RenderScript rs = RenderScript.create(theActivity);
ScriptIntrinsicBlur theIntrinsic = ScriptIntrinsicBlur.create(mRS, Element.U8_4(rs));;
Allocation tmpIn = Allocation.createFromBitmap(rs, inputBitmap);
Allocation tmpOut = Allocation.createFromBitmap(rs, outputBitmap);
theIntrinsic.setRadius(25.f);
theIntrinsic.setInput(tmpIn);
theIntrinsic.forEach(tmpOut);
tmpOut.copyTo(outputBitmap);


This example creates a RenderScript context and a Blur intrinsic. It then uses the intrinsic to perform a Gaussian blur with a 25-pixel radius on the allocation. The default implementation of blur uses carefully hand-tuned assembly code, but on some hardware it will instead use hand-tuned GPU code.


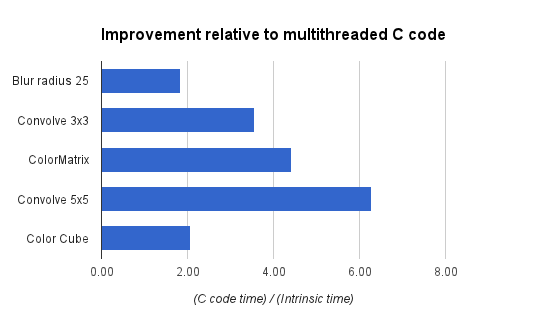
What do developers get from the tuning that we’ve done? On the new Nexus 7, running that same 25-pixel radius Gaussian blur on a 1.6 megapixel image takes about 176ms. A simpler intrinsic like the color matrix operation takes under 4ms. The intrinsics are typically 2-3x faster than a multithreaded C implementation and often 10x+ faster than a Java implementation. Pretty good for eight lines of code.


Renderscript optimizations chartstyle="border:1px solid #ddd;border-radius: 6px;" />
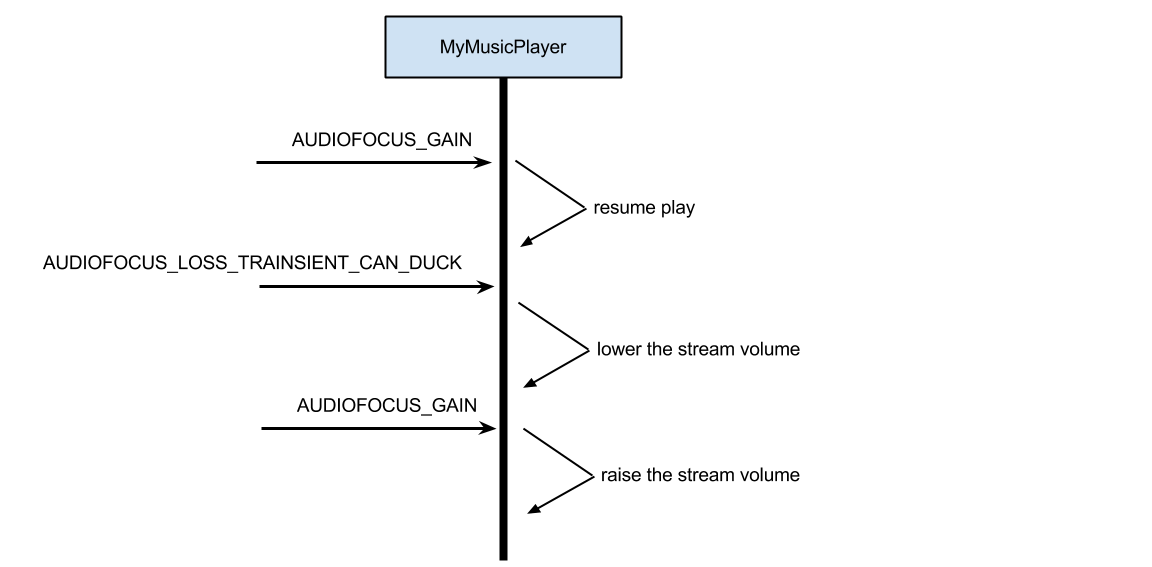
Figure 1. Performance gains with RenderScript intrinsics, relative to equivalent multithreaded C implementations.


Applications that need additional functionality can mix these intrinsics with their own RenderScript kernels. An example of this would be an application that is taking camera preview data, converting it from YUV to RGB, adding a vignette effect, and uploading the final image to a SurfaceView for display.


In this example, we’ve got a stream of data flowing between a source device (the camera) and an output device (the display) with a number of possible processors along the way. Today, these operations can all run on the CPU, but as architectures become more advanced, using other processors becomes possible.


For example, the vignette operation can happen on a compute-capable GPU (like the ARM Mali T604 in the Nexus 10), while the YUV to RGB conversion could happen directly on the camera’s image signal processor (ISP). Using these different processors could significantly improve power consumption and performance. As more these processors become available, future Android updates will enable RenderScript to run on these processors, and applications written for RenderScript today will begin to make use of those processors transparently, without any additional work for developers.


Intrinsics provide developers a powerful tool they can leverage with minimal effort to achieve great performance across a wide variety of hardware. They can be mixed and matched with general purpose developer code allowing great flexibility in application design. So next time you have performance issues with image manipulation, I hope you give them a look to see if they can help.


Wednesday, 28 August 2013

Respecting Audio Focus


Posted by Kristan Uccello, Google Developer Relations


It’s rude to talk during a presentation, it disrespects the speaker and annoys the audience. If your application doesn’t respect the rules of audio focus then it’s disrespecting other applications and annoying the user. If you have never heard of audio focus you should take a look at the Android developer training material.

With multiple apps potentially playing audio it's important to think about how they should interact. To avoid every music app playing at the same time, Android uses audio focus to moderate audio playback—your app should only play audio when it holds audio focus. This post provides some tips on how to handle changes in audio focus properly, to ensure the best possible experience for the user.


Requesting audio focus


Audio focus should not be requested when your application starts (don’t get greedy), instead delay requesting it until your application is about to do something with an audio stream. By requesting audio focus through the AudioManager system service, an application can use one of the AUDIOFOCUS_GAIN* constants (see Table 1) to indicate the desired level of focus.


Listing 1. Requesting audio focus.


1. AudioManager am = (AudioManager) mContext.getSystemService(Context.AUDIO_SERVICE);
2.
3. int result = am.requestAudioFocus(mOnAudioFocusChangeListener,
4. // Hint: the music stream.
5. AudioManager.STREAM_MUSIC,
6. // Request permanent focus.
7. AudioManager.AUDIOFOCUS_GAIN);
8. if (result == AudioManager.AUDIOFOCUS_REQUEST_GRANTED) {
9. mState.audioFocusGranted = true;
10. } else if (result == AudioManager.AUDIOFOCUS_REQUEST_FAILED) {
11. mState.audioFocusGranted = false;
12. }


In line 7 above, you can see that we have requested permanent audio focus. An application could instead request transient focus using AUDIOFOCUS_GAIN_TRANSIENT which is appropriate when using the audio system for less than 45 seconds.


Alternatively, the app could use AUDIOFOCUS_GAIN_TRANSIENT_MAY_DUCK, which is appropriate when the use of the audio system may be shared with another application that is currently playing audio (e.g. for playing a "keep it up" prompt in a fitness application and expecting background music to duck during the prompt). The app requesting AUDIOFOCUS_GAIN_TRANSIENT_MAY_DUCK should not use the audio system for more than 15 seconds before releasing focus.


Handling audio focus changes


In order to handle audio focus change events, an application should create an instance of OnAudioFocusChangeListener. In the listener, the application will need to handle theAUDIOFOCUS_GAIN* event and AUDIOFOCUS_LOSS* events (see Table 1). It should be noted that AUDIOFOCUS_GAIN has some nuances which are highlighted in Listing 2, below.


Listing 2. Handling audio focus changes.


1. mOnAudioFocusChangeListener = new AudioManager.OnAudioFocusChangeListener() {  
2.
3. @Override
4. public void onAudioFocusChange(int focusChange) {
5. switch (focusChange) {
6. case AudioManager.AUDIOFOCUS_GAIN:
7. mState.audioFocusGranted = true;
8.
9. if(mState.released) {
10. initializeMediaPlayer();
11. }
12.
13. switch(mState.lastKnownAudioFocusState) {
14. case UNKNOWN:
15. if(mState.state == PlayState.PLAY && !mPlayer.isPlaying()) {
16. mPlayer.start();
17. }
18. break;
19. case AudioManager.AUDIOFOCUS_LOSS_TRANSIENT:
20. if(mState.wasPlayingWhenTransientLoss) {
21. mPlayer.start();
22. }
23. break;
24. case AudioManager.AUDIOFOCUS_LOSS_TRANSIENT_CAN_DUCK:
25. restoreVolume();
26. break;
27. }
28.
29. break;
30. case AudioManager.AUDIOFOCUS_LOSS:
31. mState.userInitiatedState = false;
32. mState.audioFocusGranted = false;
33. teardown();
34. break;
35. case AudioManager.AUDIOFOCUS_LOSS_TRANSIENT:
36. mState.userInitiatedState = false;
37. mState.audioFocusGranted = false;
38. mState.wasPlayingWhenTransientLoss = mPlayer.isPlaying();
39. mPlayer.pause();
40. break;
41. case AudioManager.AUDIOFOCUS_LOSS_TRANSIENT_CAN_DUCK:
42. mState.userInitiatedState = false;
43. mState.audioFocusGranted = false;
44. lowerVolume();
45. break;
46. }
47. mState.lastKnownAudioFocusState = focusChange;
48. }
49.};


AUDIOFOCUS_GAIN is used in two distinct scopes of an applications code. First, it can be used when registering for audio focus as shown in Listing 1. This does NOT translate to an event for the registered OnAudioFocusChangeListener, meaning that on a successful audio focus request the listener will NOT receive an AUDIOFOCUS_GAIN event for the registration.


AUDIOFOCUS_GAIN is also used in the implementation of an OnAudioFocusChangeListener as an event condition. As stated above, the AUDIOFOCUS_GAIN event will not be triggered on audio focus requests. Instead the AUDIOFOCUS_GAIN event will occur only after an AUDIOFOCUS_LOSS* event has occurred. This is the only constant in the set shown Table 1 that is used in both scopes.


There are four cases that need to be handled by the focus change listener. When the application receives an AUDIOFOCUS_LOSS this usually means it will not be getting its focus back. In this case the app should release assets associated with the audio system and stop playback. As an example, imagine a user is playing music using an app and then launches a game which takes audio focus away from the music app. There is no predictable time for when the user will exit the game. More likely, the user will navigate to the home launcher (leaving the game in the background) and launch yet another application or return to the music app causing a resume which would then request audio focus again.


However another case exists that warrants some discussion. There is a difference between losing audio focus permanently (as described above) and temporarily. When an application receives an AUDIOFOCUS_LOSS_TRANSIENT, the behavior of the app should be that it suspends its use of the audio system until it receives an AUDIOFOCUS_GAIN event. When the AUDIOFOCUS_LOSS_TRANSIENT occurs, the application should make a note that the loss is temporary, that way on audio focus gain it can reason about what the correct behavior should be (see lines 13-27 of Listing 2).


Sometimes an app loses audio focus (receives an AUDIOFOCUS_LOSS) and the interrupting application terminates or otherwise abandons audio focus. In this case the last application that had audio focus may receive an AUDIOFOCUS_GAIN event. On the subsequent AUDIOFOCUS_GAIN event the app should check and see if it is receiving the gain after a temporary loss and can thus resume use of the audio system or if recovering from an permanent loss, setup for playback.


If an application will only be using the audio capabilities for a short time (less than 45 seconds), it should use an AUDIOFOCUS_GAIN_TRANSIENT focus request and abandon focus after it has completed its playback or capture. Audio focus is handled as a stack on the system — as such the last process to request audio focus wins.


When audio focus has been gained this is the appropriate time to create a MediaPlayer or MediaRecorder instance and allocate resources. Likewise when an app receives AUDIOFOCUS_LOSS it is good practice to clean up any resources allocated. Gaining audio focus has three possibilities that also correspond to the three audio focus loss cases in Table 1. It is a good practice to always explicitly handle all the loss cases in the OnAudioFocusChangeListener.


Table 1. Audio focus gain and loss implication.


GAINLOSS
AUDIOFOCUS_GAINAUDIOFOCUS_LOSS
AUDIOFOCUS_GAIN_TRANSIENTAUDIOFOCUS_LOSS_TRANSIENT
AUDIOFOCUS_GAIN_TRANSIENT_MAY_DUCKAUDIOFOCUS_LOSS_TRANSIENT_CAN_DUCK


Note: AUDIOFOCUS_GAIN is used in two places. When requesting audio focus it is passed in as a hint to the AudioManager and it is used as an event case in the OnAudioFocusChangeListener. The gain events highlighted in green are only used when requesting audio focus. The loss events are only used in the OnAudioFocusChangeListener.


Table 2. Audio stream types.


Stream TypeDescription
STREAM_ALARMThe audio stream for alarms
STREAM_DTMFThe audio stream for DTMF Tones
STREAM_MUSICThe audio stream for "media" (music, podcast, videos) playback
STREAM_NOTIFICATIONThe audio stream for notifications
STREAM_RINGThe audio stream for the phone ring
STREAM_SYSTEMThe audio stream for system sounds


An app will request audio focus (see an example in the sample source code linked below) from the AudioManager (Listing 1, line 1). The three arguments it provides are an audio focus change listener object (optional), a hint as to what audio channel to use (Table 2, most apps should use STREAM_MUSIC) and the type of audio focus from Table 1, column 1. If audio focus is granted by the system (AUDIOFOCUS_REQUEST_GRANTED), only then handle any initialization (see Listing 1, line 9).


Note: The system will not grant audio focus (AUDIOFOCUS_REQUEST_FAILED) if there is a phone call currently in process and the application will not receive AUDIOFOCUS_GAIN after the call ends.


Within an implementation of OnAudioFocusChange(), understanding what to do when an application receives an onAudioFocusChange() event is summarized in Table 3.


In the cases of losing audio focus be sure to check that the loss is in fact final. If the app receives an AUDIOFOCUS_LOSS_TRANSIENT or AUDIOFOCUS_LOSS_TRANSIENT_CAN_DUCK it can hold onto the media resources it has created (don’t call release()) as there will likely be another audio focus change event very soon thereafter. The app should take note that it has received a transient loss using some sort of state flag or simple state machine.


If an application were to request permanent audio focus with AUDIOFOCUS_GAIN and then receive an AUDIOFOCUS_LOSS_TRANSIENT_CAN_DUCK an appropriate action for the application would be to lower its stream volume (make sure to store the original volume state somewhere) and then raise the volume upon receiving an AUDIOFOCUS_GAIN event (see Figure 1, below).


Table 3. Appropriate actions by focus change type.


Focus Change TypeAppropriate Action
AUDIOFOCUS_GAINGain event after loss event: Resume playback of media unless other state flags set by the application indicate otherwise. For example, the user paused the media prior to loss event.
AUDIOFOCUS_LOSSStop playback. Release assets.
AUDIOFOCUS_LOSS_TRANSIENTPause playback and keep a state flag that the loss is transient so that when the AUDIOFOCUS_GAIN event occurs you can resume playback if appropriate. Do not release assets.
AUDIOFOCUS_LOSS_TRANSIENT_CAN_DUCKLower volume or pause playback keeping track of state as with AUDIOFOCUS_LOSS_TRANSIENT. Do not release assets.


Conclusion and further reading


Understanding how to be a good audio citizen application on an Android device means respecting the system's audio focus rules and handling each case appropriately. Try to make your application behave in a consistent manner and not negatively surprise the user. There is a lot more that can be talked about within the audio system on Android and in the material below you will find some additional discussions.


Example source code is available here:


https://android.googlesource.com/platform/development/+/master/samples/RandomMusicPlayer


Followers