Tuesday, 15 January 2013

Android Developer Story: Smule

Check out our latest Android developer story, this one from Smule, creators of AutoRap, Magic Piano, and Songify.


In this short video, the Smule team talks about their experiences launching on Android, the explosive global growth they’ve seen on Google Play, and some of the techniques they use to market and monetize their products effectively across the world.


Visit the Spotlight pages in the Android Developers site to see our growing list of developer stories.


Monday, 14 January 2013

Evolution of Renderscript Performance

Posted by R. Jason Sams, Android Renderscript Tech Lead


It’s been a year since the last blog post on Renderscript, and with the release of Android 4.2, it’s a good time to talk about the performance work that we’ve done since then. One of the major goals of this past year was to improve the performance of common image-processing operations with Renderscript.


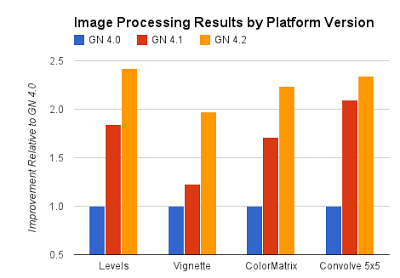
Renderscipt optimizations chartstyle="border:1px solid #ddd;border-radius: 6px;" />

Figure 1. Renderscript image-processing benchmarks run on different Android platform versions (Android 4.0, 4.1, and 4.2) in CPU only on a Galaxy Nexus device.


Figure 2. Renderscript image-processing benchmarks comparing operations run with GPU + CPU to those run in CPU only on the same Nexus 10 device.


When you set out to improve performance, the first task is to measure it. To do this, we built a image-processing benchmark suite. The tests measure how long it takes to apply a given image processing operation to a roughly 1.7 million pixel bitmap. We then ran the benchmark using the same APK on the Galaxy Nexus and normalized the results from Ice Cream Sandwich to 1.0.


We made a few major improvements between ICS and Jelly Bean, which significantly reduced the overhead of short scripts as well as the cost of getting elements out of allocations. Going from Android 4.1 to Android 4.2, we added a number of performance improvements to the math library. Our hardware partners also made major contributions; ARM in particular provided numerous compiler improvements which greatly improved our ability to generate vector code.


Android 4.2 introduced another much more important change: For the first time on any mobile platform. we can use the GPU as a compute device. When run on a device that supports GPU compute, that same benchmark APK will run on the GPU. The chart in Figure 2 is normalized to the same basis as Figure 1.


The Cortex A15 in Nexus 10 is a very good CPU. However, that doesn’t mean we should leave resources idle. The Mali T604 is a very flexible and capable compute device capable of executing a large subset of RenderScript functionality. The green bar in Figure 2 shows what we can do when the Mali is enabled for RS compute. No effort is required on an app developer's part to enable this acceleration; the device will inspect each script and decide which processor to run things automatically. It’s important to note that some scripts can’t be run on the GPU, and such scripts will automatically run on the CPU.


The best part is it doesn’t end here. Performance work is an ongoing effort. RenderScript performance in applications will continue to improve over time as we continue to improve the platform.


To learn more about using Renderscript, see the Renderscript Computation developer's guide.


Tuesday, 8 January 2013

Verifying Back-End Calls from Android Apps

Posted by Tim Bray

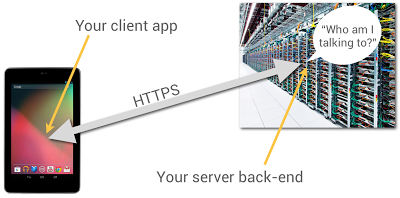
Most Android apps have some sort of server-side back end, to persist and share data. Even the most basic game needs to remember its players’ high scores. When you’re building your back end, one problem you have to solve is how the back-end code knows what app it’s talking to and who the person using it is.

You probably have HTTP endpoints for communicating with your client apps, but how can the server-side code be sure who’s sending messages to it? After all, anyone can send HTTP POST requests from anywhere; could they impersonate your users if they could guess their identities?

It’s really user-unfriendly to ask people to type in usernames and passwords on mobile devices. In particular, if someone has installed your app and given it permission to use the Internet and know your identity, they shouldn’t be pestered any more.

It turns out that Google Play services, now available on every compatible device running Android release 2.2 or higher, offers a good solution to this problem, based on the use of Google Accounts.

Summary

Doing this is a multi-step process, which I’ll outline in full, but here’s the short version: You use the GoogleAuthUtil class, available through Google Play services, to retrieve a string called an “ID Token”. You send the token to your back end and your back end can use it to quickly and cheaply verify which app sent it and who was using the app.

This capability is built into Google facilities such as App Engine’s new Cloud Endpoints feature, which bakes app/back-end identity into a simple programming model.

Now let’s get to the details.

App Registration

You’re going to have to use the Google API Console quite a bit in this process. You’ll need to make a new project for this purpose; while you can give it a nice human-readable name and graphical branding, it turns out that those resources aren’t used in this particular scenario.

You can also authorize this project to access a large number of different Google APIs; but once again, you don’t need to in this scenario.

You should give serious thought to the people you authorize as members of the project, since these are important administrative roles.

Make Client IDs

You’ll need to make two different OAuth 2.0 “Client IDs” for your project. The first one is a “Client ID for Web applications”. Once again, you can ignore all the labeling and branding stuff, you’ll just need the Client-ID string, which will look something like 9414861317621.apps.googleusercontent.com.

Now you’ll need to make another Client ID for your Android app. To do this, you’ll need to provide two pieces of information: your app’s package name and cert signature. The package name is just the Java-style reverse-DNS, as given in the top-level “package” attribute in your AndroidManifest.xml, for example com.example.identity.

To get your app’s cert signature, use the following shell command:

$ keytool -exportcert -alias <your-key-name> -keystore <your-key-store-file> -v -list

Copy the octets labeled “SHA1”, paste them into the Developer Console field, and create your app’s Client ID. Once again, all you’ll really need from the readout is the Client-ID string.

In Your Android App

You’ll need to call the Google Play services GoogleAuthUtil class to get an ID token; the procedure is as described in Obtaining an Access Token. There’s one extra bit of magic: the value of the scope argument to the getToken(email, scope) method. It has to be the string audience:server:client_id:X, where X is the Client ID of for the Web app, as described above. If our Client ID were the example value given above, the value of the scope argument would be audience:server:client_id:9414861317621.apps.googleusercontent.com.

Magic Happens

Normally, when you ask for an OAuth token, the person using the device sees a challenge, asking them if it’s OK to use their identity to get at some resource or other. But in this case, the system looks at the server-side Client ID in your scope argument, notices that it’s in the same project as your Android app, and gives you the token without pestering the user; they’ve already agreed to a relationship with you, the developer who controls that project.

Send the Token

When you’re ready to start talking to your server back end, you need to send the token string to it. The best way to do this is in the body of an POST message; you could put it in a URL parameter, but they’re often logged. You absolutely must use an HTTPS connection, to keep any men-in-the-middle from peeking at your token.

There’s no particular reason for extra round-trips; if you’re sending a game high score to your back end, just stick the ID Token string in as an extra argument.

Use the Token

When your server receives the token from your Android app, it’s really important that you verify it. This requires two steps:

  1. Verify that it’s really signed by Google.

  2. Verify that it’s really meant for you.

Verify Signature

It turns out that this is signed using a Google public/private key pair, and Google publishes the public keys (which we change regularly) at www.googleapis.com/oauth2/v1/certs; go ahead and have a look.

You have to verify that the ID Token, which is actually a JSON Web Token, was signed with one of those certs. Fortunately, there are decent libraries around to do this; in this post, I’ll give pointers for Java, Ruby, and PHP.

The libraries can cache the Google certs and only refresh them when required, so the verification is (almost always) a fast static call.

Verify Token Fields

It turns out that the ID Token has a JSON payload, and most libraries that validate the signatures also give it to you as a hash or dictionary or whatever. Thus, you can retrieve named fields, such as aud and azp and email.

First, you have to look at the field named aud and verify that it’s identical to your Client ID, the string you included in the Android app’s scope argument. Seriously, do not omit this step; if you don't verify the ID Token, then any other developer can spoof requests to your service.

Optionally, you can look at the field named azp (stands for “authorized party”) and verify that it is identical to the Client ID of your Android app. By the way, you can have multiple different Android client apps, each with its own Client ID, in that top-level project.

Let’s assume you’ve done all three of these things. Then, you know that:

  1. The token was issued by Google.

  2. The token was sent to a device that was being operated by the person identified in the payload's email field.

You also have high confidence that:

  1. The token was obtained by the Android app identified by the Client ID in the payload’s azp field.

The Client ID only has “high confidence” because non-compatible or rooted Android devices may be able to tamper with that information. But they won't be able to fake the Google signature or the authentication of the device user to Google.

What’s Next?

That’s up to you. You know which person and app you’re talking to, it’s up to you what to do with that information.

Code Fragments

Here’s a Java class that implements an ID-Token checker using the Google Java libraries:

import java.io.IOException;
import java.security.GeneralSecurityException;

import com.google.api.client.googleapis.auth.oauth2.GoogleIdToken;
import com.google.api.client.googleapis.auth.oauth2.GoogleIdTokenVerifier;
import com.google.api.client.http.javanet.NetHttpTransport;
import com.google.api.client.json.JsonFactory;
import com.google.api.client.json.gson.GsonFactory;

public class Checker {

private final List mClientIDs;
private final String mAudience;
private final GoogleIdTokenVerifier mVerifier;
private final JsonFactory mJFactory;
private String mProblem = "Verification failed. (Time-out?)";

public Checker(String[] clientIDs, String audience) {
mClientIDs = Arrays.asList(clientIDs);
mAudience = audience;
NetHttpTransport transport = new NetHttpTransport();
mJFactory = new GsonFactory();
mVerifier = new GoogleIdTokenVerifier(transport, mJFactory);
}

public GoogleIdToken.Payload check(String tokenString) {
GoogleIdToken.Payload payload = null;
try {
GoogleIdToken token = GoogleIdToken.parse(mJFactory, tokenString);
if (mVerifier.verify(token)) {
GoogleIdToken.Payload tempPayload = token.getPayload();
if (!tempPayload.getAudience().equals(mAudience))
mProblem = "Audience mismatch";
else if (!mClientIDs.contains(tempPayload.getIssuee()))
mProblem = "Client ID mismatch";
else
payload = tempPayload;
}
} catch (GeneralSecurityException e) {
mProblem = "Security issue: " + e.getLocalizedMessage();
} catch (IOException e) {
mProblem = "Network problem: " + e.getLocalizedMessage();
}
return payload;
}

public String problem() {
return mProblem;
}
}

If you wanted to do this in Ruby, you’d want to install the google-id-token Ruby gem, and do something like this:

require 'google-id-token'
validator = GoogleIDToken::Validator.new
jwt = validator.check(token, required_audience, required_client_id)
if jwt
email = jwt['email']
else
report "Cannot validate: #{validator.problem}"
end

For PHP programmers, check out the Google APIs Client Library for PHP, in particular the function verifyIdToken in apiOAuth2.php.

Thursday, 27 December 2012

Daydream: Interactive Screen Savers

Posted by Daniel Sandler, a software engineer on the Android System UI team
Daydream


I’ve always loved screen savers. Supposedly they exist for a practical purpose: protecting that big, expensive monitor from the ghosts of spreadsheets past.


But I’ve always imagined that your computer is secretly hoping you’ll stand up and walk away for a bit. Just long enough for that idle timer to expire…so it can run off and play for a little while. Draw a picture, set off fireworks, explore the aerodynamics of kitchen appliances, whatever—while always ready to get back to work at a keystroke or nudge of the mouse.


Daydream, new in Android 4.2, brings this kind of laid-back, whimsical experience to Android phones and tablets that would otherwise be sleeping. If you haven’t checked it out, you can turn it on in the Settings app, in Display > Daydream; touch When to Daydream to enable the feature when charging.


An attract mode for apps


Apps that support Daydream can take advantage of the full Android UI toolkit in this mode, which means it’s easy to take existing components of your app — including layouts, animations, 3D, and custom views—and remix them for a more ambient presentation. And since you can use touchscreen input in this mode as well, you can provide a richly interactive experience if you choose.


Daydream provides an opportunity for your app to show off a little bit. You can choose to hide some of your app’s complexity in favor of one or more visually compelling experiences that can entertain from across a room, possibly drawing the user into your full app, like a video game’s attract mode.


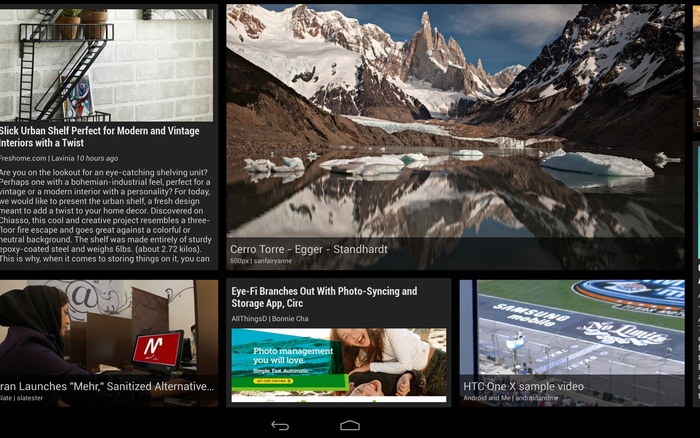
Figure 1. Google Currents scrolls stories past in a smooth, constantly-moving wall of news.


Google Currents is a great example of this approach: as a Daydream, it shows a sliding wall of visually-interesting stories selected from your editions. Touch a story, however, and Currents will show it to you full-screen; touch again to read it in the full Currents app.


The architecture of a Daydream


Each Daydream implementation is a subclass of android.service.dreams.DreamService. When you extend DreamService, you’ll have access to a simple Activity-like lifecycle API.


Key methods on DreamService to override in your subclass (don’t forget to call the superclass implementation):


Important methods on DreamService that you may want to call:


  • setContentView() — set the scene for your Daydream. Can be a layout XML resource ID or an instance of View, even a custom View you implement yourself.

  • setInteractive(boolean) — by default, your Daydream will exit if the user touches the screen, like a classic screen saver. If you want the user to be able to touch and interact with your Views, call setInteractive(true).

  • setFullscreen(boolean) — convenience method for hiding the status bar (see below).

  • setScreenBright(boolean) — by default, Daydreams keep the screen on at full brightness, which may not be appropriate for some situations (for example, dark rooms); setting this to false will reduce the display brightness to a very low level.


Finally, to advertise your Daydream to the system, create a <service> for it in your AndroidManifest.xml:


<?xml version="1.0" encoding="utf-8"?>
<manifest xmlns:android="http://schemas.android.com/apk/res/android"
package="com.example.app">
<uses-sdk android:targetSdkVersion="17" android:minSdkVersion="17" />

<application>
<service
android:name=".ExampleDaydream"
android:exported="true"
android:label="@string/my_daydream_name">
<intent-filter>
<action android:name="android.service.dreams.DreamService" />
<category android:name="android.intent.category.DEFAULT" />
</intent-filter>
<meta-data
android:name="android.service.dream"
android:resource="@xml/dream_info" />
</service>
</application>
</manifest>


The <meta-data> tag is optional; it allows you to point to an XML resource that specifies a settings Activity specific to your Daydream. The user can reach it by tapping the settings icon next to your Daydream’s name in the Settings app.


<!-- res/xml/dream_info.xml -->
<?xml version="1.0" encoding="utf-8"?>
<dream xmlns:android="http://schemas.android.com/apk/res/android"
android:settingsActivity="com.example.app/.ExampleDreamSettingsActivity" />


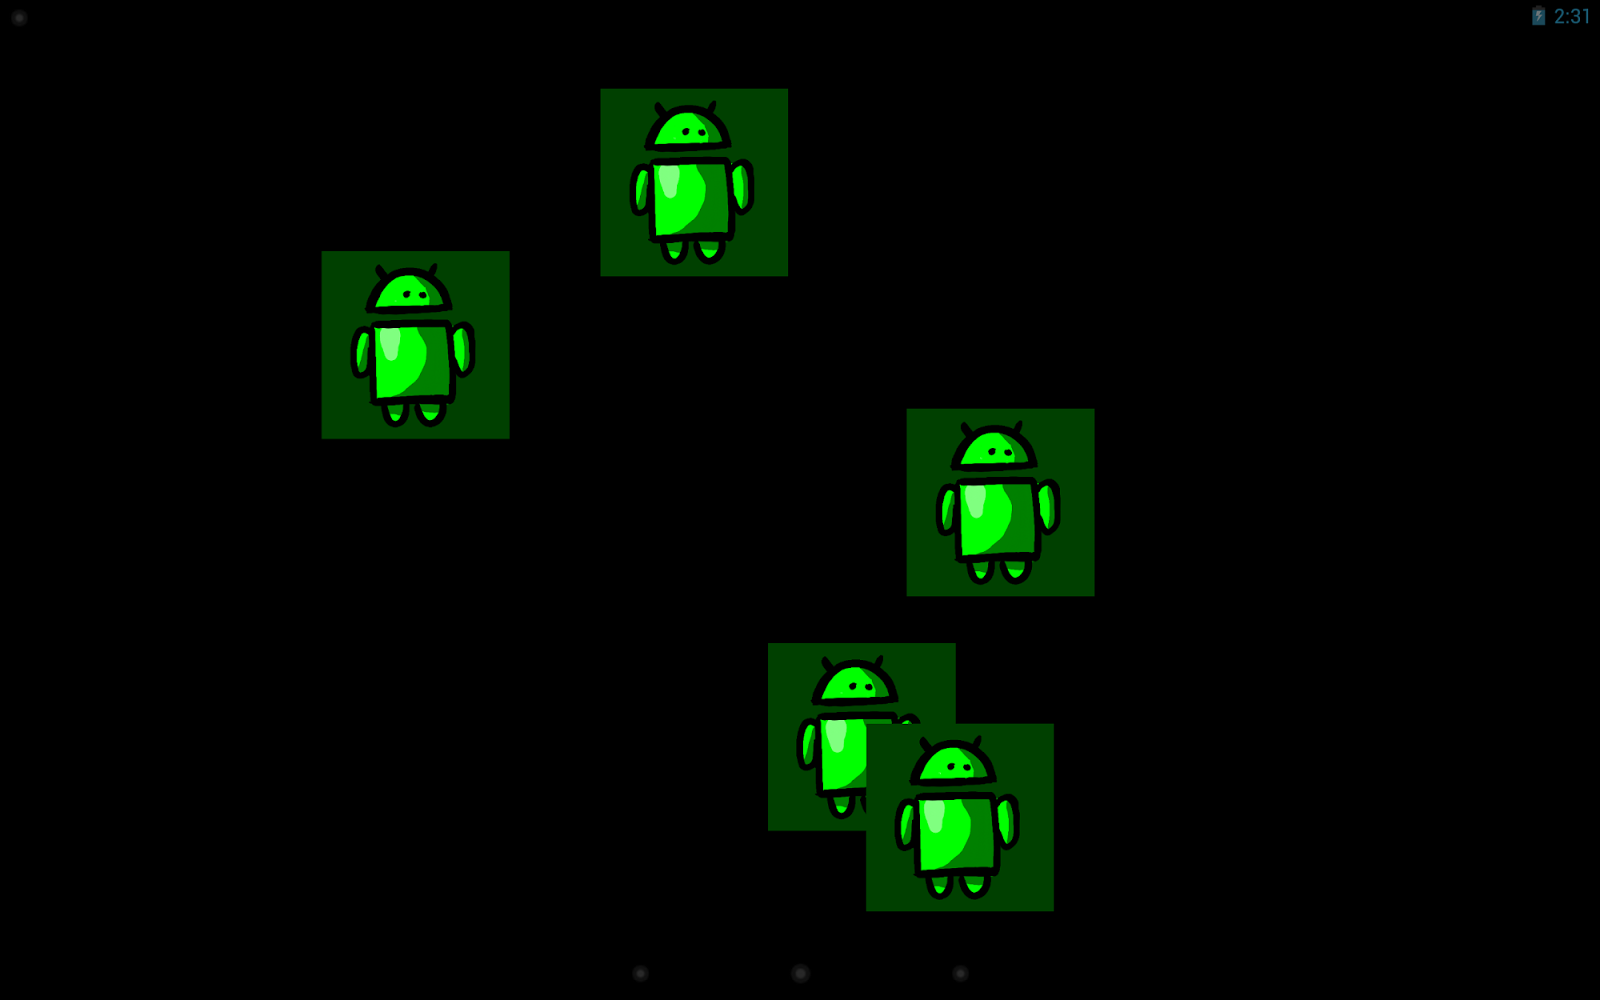
Here's an example to get you going: a classic screen saver, the bouncing logo, implemented using a TimeAnimator to give you buttery-smooth 60Hz animation.


Figure 2. Will one of them hit the corner?


public class BouncerDaydream extends DreamService {
@Override
public void onDreamingStarted() {
super.onDreamingStarted();

// Our content view will take care of animating its children.
final Bouncer bouncer = new Bouncer(this);
bouncer.setLayoutParams(new
ViewGroup.LayoutParams(MATCH_PARENT, MATCH_PARENT));
bouncer.setSpeed(200); // pixels/sec

// Add some views that will be bounced around.
// Here I'm using ImageViews but they could be any kind of
// View or ViewGroup, constructed in Java or inflated from
// resources.
for (int i=0; i<5; i++) {
final FrameLayout.LayoutParams lp
= new FrameLayout.LayoutParams(WRAP_CONTENT, WRAP_CONTENT);
final ImageView image = new ImageView(this);
image.setImageResource(R.drawable.android);
image.setBackgroundColor(0xFF004000);
bouncer.addView(image, lp);
}

setContentView(bouncer);
}
}

public class Bouncer extends FrameLayout implements TimeAnimator.TimeListener {
private float mMaxSpeed;
private final TimeAnimator mAnimator;
private int mWidth, mHeight;

public Bouncer(Context context) {
this(context, null);
}

public Bouncer(Context context, AttributeSet attrs) {
this(context, attrs, 0);
}

public Bouncer(Context context, AttributeSet attrs, int flags) {
super(context, attrs, flags);
mAnimator = new TimeAnimator();
mAnimator.setTimeListener(this);
}

/**
* Start the bouncing as soon as we’re on screen.
*/
@Override
public void onAttachedToWindow() {
super.onAttachedToWindow();
mAnimator.start();
}

/**
* Stop animations when the view hierarchy is torn down.
*/
@Override
public void onDetachedFromWindow() {
mAnimator.cancel();
super.onDetachedFromWindow();
}

/**
* Whenever a view is added, place it randomly.
*/
@Override
public void addView(View v, ViewGroup.LayoutParams lp) {
super.addView(v, lp);
setupView(v);
}

/**
* Reposition all children when the container size changes.
*/
@Override
protected void onSizeChanged (int w, int h, int oldw, int oldh) {
super.onSizeChanged(w, h, oldw, oldh);
mWidth = w;
mHeight = h;
for (int i=0; i<getChildCount(); i++) {
setupView(getChildAt(i));
}
}

/**
* Bouncing view setup: random placement, random velocity.
*/
private void setupView(View v) {
final PointF p = new PointF();
final float a = (float) (Math.random()*360);
p.x = mMaxSpeed * (float)(Math.cos(a));
p.y = mMaxSpeed * (float)(Math.sin(a));
v.setTag(p);
v.setX((float) (Math.random() * (mWidth - v.getWidth())));
v.setY((float) (Math.random() * (mHeight - v.getHeight())));
}

/**
* Every TimeAnimator frame, nudge each bouncing view along.
*/
public void onTimeUpdate(TimeAnimator animation, long elapsed, long dt_ms) {
final float dt = dt_ms / 1000f; // seconds
for (int i=0; i<getChildCount(); i++) {
final View view = getChildAt(i);
final PointF v = (PointF) view.getTag();

// step view for velocity * time
view.setX(view.getX() + v.x * dt);
view.setY(view.getY() + v.y * dt);

// handle reflections
final float l = view.getX();
final float t = view.getY();
final float r = l + view.getWidth();
final float b = t + view.getHeight();
boolean flipX = false, flipY = false;
if (r > mWidth) {
view.setX(view.getX() - 2 * (r - mWidth));
flipX = true;
} else if (l < 0) {
view.setX(-l);
flipX = true;
}
if (b > mHeight) {
view.setY(view.getY() - 2 * (b - mHeight));
flipY = true;
} else if (t < 0) {
view.setY(-t);
flipY = true;
}
if (flipX) v.x *= -1;
if (flipY) v.y *= -1;
}
}

public void setSpeed(float s) {
mMaxSpeed = s;
}
}


This example code is handy for anything you want to show the user without burning it into the display (like a simple graphic or an error message), and it also makes a great starting point for more complex Daydream projects.


A few more idle thoughts


  • First, do no harm: Daydream is meant to run when a device is charging. However, if the Daydream consumes too much CPU, charging might happen very slowly or not at all! The system will stop your Daydream if it detects that the device is not charging, so make sure your code leaves enough power to charge the battery in a reasonable amount of time.

  • Respect the lockscreen: Daydream runs on top of the secure keyguard, which means that if you might be showing sensitive content, you need to give the user tools to control that content. For example, Photo Table and Photo Frame allow the user to select the albums from which photos will be displayed (avoiding embarrassing slideshows).

  • Screen brightness: Think about where you expect your Daydream to be used and adjust the screen brightness accordingly using setScreenBright() and possibly even using darker or brighter colors as necessary. A bedside clock will need to be dimmer than a desk clock; if you expect your Daydream to serve both purposes you'll need to give the user a choice.

  • To hide the status bar or not: Many users will need instant access to the battery level and time of day, so you should avoid using setFullscreen(), particularly if your Daydream is more informational than artistic. Daydream will start with the status bar in “lights out” mode (View.SYSTEM_UI_FLAG_LOW_PROFILE), where it’s quite unobtrusive but still shows the clock and charge status.

  • When to use settings: In general, you have a little latitude for adding extra knobs and dials to Daydream settings. After all, this is a personalization feature, so users should be encouraged to tweak things until they feel at home. Sometimes, though, a more compelling experience can come from taking an artistic stand: giving the user a choice from a small number of polished, beautiful configurations (rather than providing all the controls of a commercial airline cockpit).

  • There can be more than one: If you discover that your settings allow the user to pick between a few radically different display modes, consider splitting your Daydream into multiple DreamService implementations. For example, the photo gallery in Android 4.2 provides both the Photo Table and Photo Frame Daydreams.

  • Use an Activity for development: Most Android development tools are optimized for developing and debugging conventional Android apps; since DreamService and Activity are so similar, it can be useful to create a testing Activity that hosts the same content view as your DreamService. This way you can launch and test your code easily from your IDE as if it were any other Android project.


OK, that’s enough for now; you have the tools to go build Daydream support into your apps. Have fun with it — if you do, your users will have fun too. Oh, and when you upload your shiny new APK to Google Play, be sure to add a note to your app’s description so that users searching for Daydreams can discover it.


Further reading and samples


  • API docs for DreamService

  • Sample code: BouncerDaydream, complete project for the code snippets in this post

  • Sample code: WebView, a Daydream that shows an HTML page

  • Sample code: Colors, a Daydream that demonstrates OpenGL ES 2.0 and TextureView


Followers